Imagine gifting small treasures this holiday season in a handmade pouch that’s as charming as it is unique.
Our Frosted Christmas Santa Gift Bag is a delightful project that brings a touch of frosty magic to your festive celebrations.
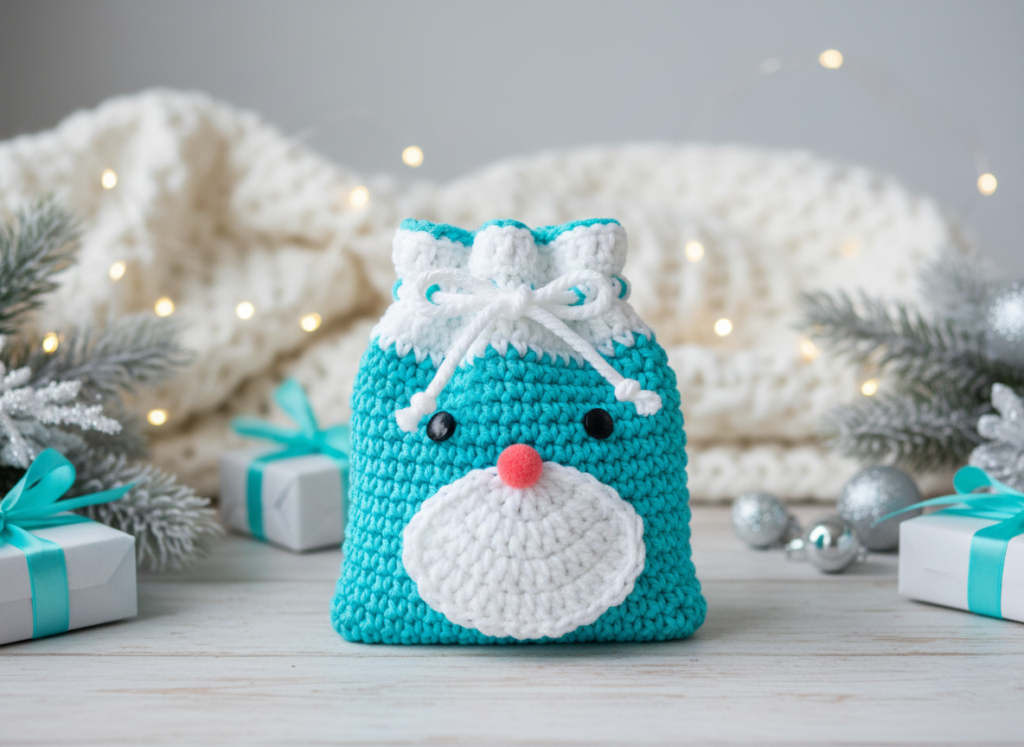
With its vivid icy turquoise body, crisp white snowy band, and adorable Santa face, this little bag feels wonderfully substantial yet soft, perfect for holding tiny presents or festive treats.
Crafting this Santa gift bag is a joy, resulting in a finished piece that’s not just a container but a part of the gift itself.
Its sturdy construction and enchanting details make it a keepsake that can be reused year after year, adding a personal, handcrafted touch to your holiday traditions.
Get ready to create something truly special!
Pattern Info
- Skill Level: Intermediate Beginner (requires consistent tension and basic seaming)
- Finished Size: Approximately 14 cm wide x 12 cm tall
- Gauge: 4 sc and 4 rows = 2.5 cm (1 inch) in single crochet
- Abbreviations Used: sc (single crochet), ch (chain), st (stitch), sl st (slip stitch), FO (fasten off)
Materials
- Yarn: Worsted weight (Category 4) acrylic or cotton blend in:
- Vivid Icy Turquoise: approx. 50 yards
- Pure-Snow-White: approx. 20 yards
- Black: a few yards for eyes
- Coral-Pink: a few yards for pom-pom nose
- Crochet Hook: 4.0 mm (G/6)
- Notions: Tapestry needle, scissors, two 6mm black safety eyes, small pom-pom maker (optional, for nose), stitch markers (optional)
Step-by-Step Overview
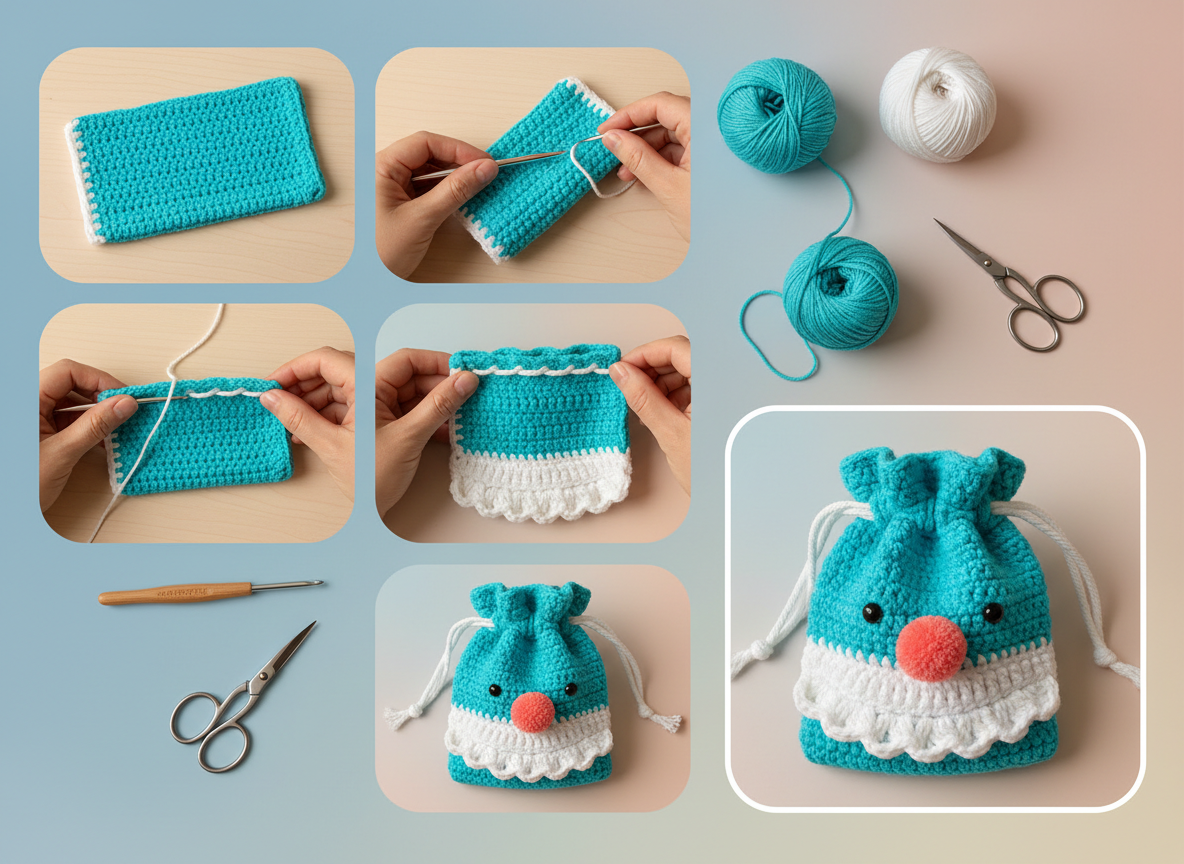
Stage 1: The Bag Body
You’ll begin by crocheting a flat rectangle that will form the main structure of your Santa bag.
Start with the vivid icy turquoise yarn, working in single crochet to create a dense, square-grid fabric. Maintain consistent tension throughout this section to ensure an even texture.
After completing the turquoise portion, switch to pure-snow-white yarn for the final rows, being sure to incorporate a row of chain spaces that will later hold the drawstring.
The finished rectangle should measure approximately 14 cm wide and 24 cm long (unfolded).
Stage 2: Seaming the Bag
Once your rectangle is complete, fold it in half so the two shorter edges meet, forming the bottom of your bag.
Using a blunt tapestry needle and pure-snow-white yarn, carefully seam the two raw side edges together.
Employ a whip stitch or mattress stitch for a clean, secure join that minimizes bulk and prevents any gaps.
At this checkpoint, your bag body will be formed, measuring approximately 14 cm wide and 12 cm tall, with open side seams.
Stage 3: The Drawstring
Next, it’s time to create the drawstring.
You can either crochet a long chain using pure-snow-white yarn or twist several strands of the same yarn together for a thicker cord.
With your tapestry needle, weave this cord in and out through the row of chain spaces you made in the pure-snow-white band at the top of the bag.
Start and end at the center front, leaving enough length on both ends for tying.
Your drawstring cord will now be threaded through the top band, ready to be pulled.
Stage 4: The Beard Panel
Now for Santa’s iconic beard!
Crochet a small, pure-white panel, carefully shaping its lower edge with a scalloped design using shell stitches or picots to give it that classic Santa look.
Position this beard panel onto the lower half of your turquoise bag body, ensuring it’s centered and visually balanced.
Securely sew the beard panel in place using pure-snow-white yarn and your tapestry needle, attaching only the top and side edges so the lovely scalloped bottom edge remains free.
At this checkpoint, the pure-white scalloped beard panel is securely sewn onto the bag.
Stage 5: Facial Features
The final magical touch is adding Santa’s cheerful face.
Carefully attach two small, round black safety eyes above the beard panel, ensuring they are horizontally centered and spaced appropriately for a friendly expression.
Then, create a tiny coral-pink pom-pom for the nose. Securely sew this pom-pom onto the beard panel, positioning it just below and between the eyes.
Double-check that all facial features are firmly attached to ensure durability. With this, all facial features (eyes and nose) are attached, completing the Santa design!
Helpful Crochet Tips
- Maintaining consistent tension, especially with single crochet, is key to achieving the desired dense, square-grid texture for the bag body. Practice a few rows before starting the main piece.
- When seaming the sides in Stage 2, use a mattress stitch if you want the seam to be nearly invisible from the outside. If you prefer a slightly more decorative or pronounced seam, a whip stitch works well.
- For the drawstring, if you’re making a crocheted chain, make it approximately twice the width of the bag opening to allow for ample tying length.
- When attaching the safety eyes, insert them through a single stitch to ensure they are stable and don’t pull large gaps in your crochet fabric.
And there you have it! Your very own charming Frosted Christmas Santa Gift Bag, ready to spread holiday cheer.
This project is not just about making a bag; it’s about infusing a little piece of your heart into a festive creation.
The vivid icy turquoise combined with the crisp white and the adorable Santa face makes for a truly unique gift presentation that will delight anyone lucky enough to receive it.
Once finished, these little Santa bags are perfect for holding small gifts, candies, or even a few homemade cookies.
Imagine a row of these peeking out from under the Christmas tree or adorning a festive mantelpiece!
You could even create a set in varying sizes by simply adjusting your starting chain for the rectangle.
For a truly professional finish, consider lightly blocking your finished bag to ensure all stitches are perfectly even and the bag holds its shape beautifully.
Ready to see every stitch come to life?
Be sure to watch the companion video for a complete visual walkthrough of each stage, from that initial flat rectangle to the final charming Santa face.
It’s the perfect way to get a clear picture of each step and ensure your project turns out just as magical.
We’d love to see your finished Frosted Christmas Santa Gift Bags! Share your creations with us on social media and spread the handmade holiday joy!