Elevate Your Everyday with the “Green Oasis” Pouch
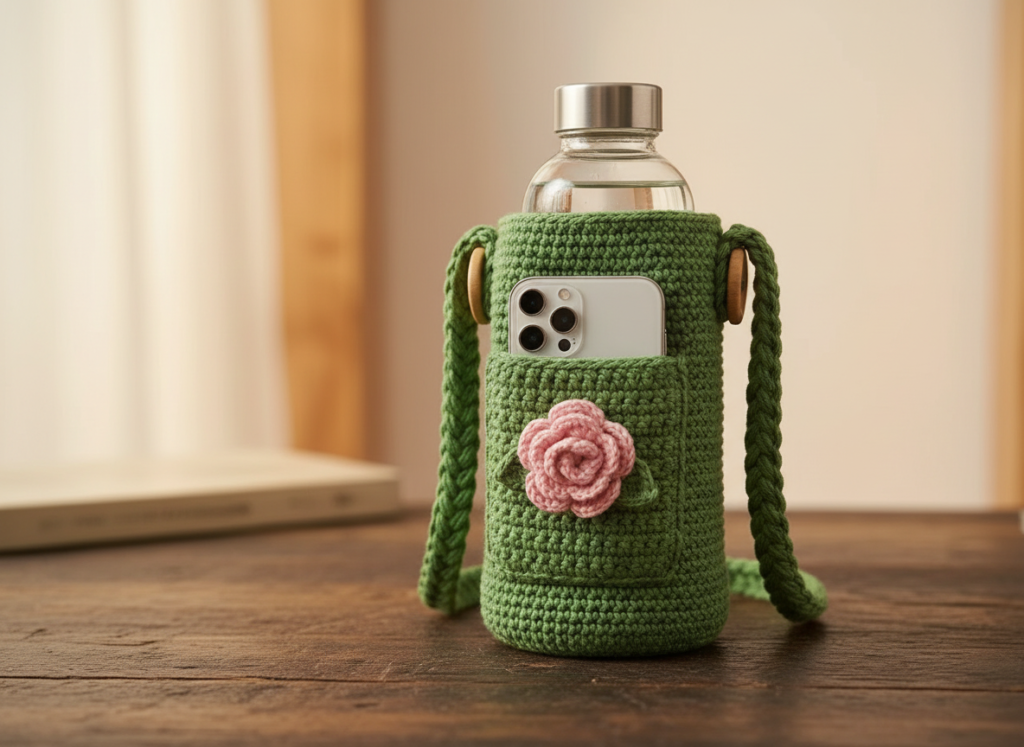
Imagine keeping your hydration and communication essentials neatly organized and stylishly accessible, no matter where your day takes you. Our “Green Oasis” Bottle & Phone Pouch is not just a practical accessory; it’s a charming, hands-free solution designed to hold a 500ml water bottle and your smartphone, adorned with a sweet 3D rose and leaves. Crafted from a serene leaf-green cotton yarn, this project yields a sturdy yet soft holder that feels wonderful to carry and adds a touch of handmade elegance to any outfit. It’s the perfect companion for walks, errands, or simply keeping your desk clutter-free.
Pattern Info
- Skill Level: Beginner-Friendly
- Finished Size: Approximately 19 cm (7.5 in) tall, 8 cm (3 in) diameter base, with a 110 cm (43 in) braided strap.
- Gauge: 16 sts and 18 rows = 10 cm (4 in) square, single crochet
- Abbreviations Used: sc (single crochet), ch (chain), sl st (slip stitch), Rnd (Round), Row (Row).
Materials
- Yarn: Worsted weight (Category 4) cotton yarn. Approximately 150-180 yards of leaf-green for the main pouch and strap, and a small amount (less than 10 yards) of pink for the rose and dark green for the leaves.
- Hook: Crochet hook suitable for worsted weight yarn (e.g., 4.0 mm or G-6).
- Notions: Two wooden buttons (approx. 2-3 cm diameter), yarn needle for weaving in ends and assembly, stitch marker (optional).
Step-by-Step Overview
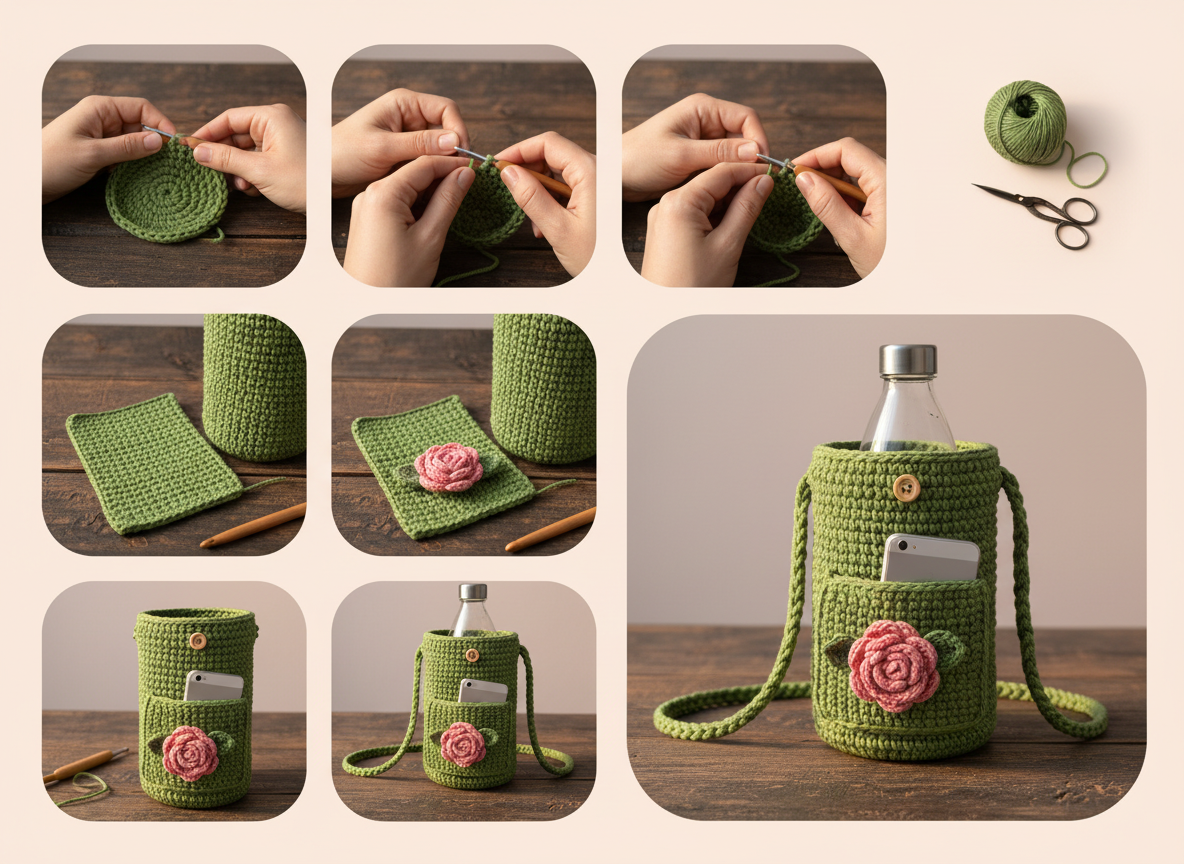
Stage 1 — Establishing the Circular Base
Begin by creating the foundational circular base for your pouch. This is achieved by working single crochet stitches in a spiral, starting with a magic ring. You’ll systematically increase stitches in each subsequent round, ensuring the base remains perfectly flat and doesn’t cup or ruffle. Pay close attention to the even distribution of your increases to maintain a smooth, round shape until you reach 42 stitches around in Rnd 7.
Stage 2 — Forming the Main Body
Once your base is complete, you’ll transition to building the main cylindrical body of the pouch. Continue working in continuous rounds of single crochet, but without any further increases. This allows the fabric to grow straight upwards, forming the tall, sturdy holder for your water bottle. Maintain consistent tension throughout this stage to ensure an even, vertical structure and prevent any leaning or bowing until the body measures 19 cm tall.
Stage 3 — Crafting the Front Pocket
Next, you’ll create the separate flat rectangular pocket designed to hold your smartphone. Start with a foundation chain to establish the desired width, then work back and forth in rows of single crochet until the pocket reaches the specified height. Once finished, carefully position and sew this pocket onto the front of the main pouch, making sure to leave the top edge open for easy access until the pocket measures 10 cm wide and 11 cm tall.
Stage 4 — Adding Floral Embellishments
Bring a touch of charm to your pouch by adding decorative floral elements. You’ll crochet a beautiful layered rose using pink yarn and two small, complementary leaves from green yarn. These three-dimensional accents are then carefully stitched onto the lower left corner of the front pocket, adding a delightful, personalized detail until you make 1 rose and 2 leaves.
Stage 5 — Finalizing the Assembly
The final stage involves bringing all the components together for a polished finish. Attach the two chosen wooden buttons securely to opposite sides of the pouch, just below the rim. Then, braid a long, sturdy strap using the leaf-green yarn, and loop its ends creatively over the attached buttons, creating a comfortable and adjustable cross-body strap. Conclude by meticulously weaving in all loose yarn ends to achieve a neat and professional appearance until you attach 2 wooden buttons and 1 braided strap.
Round base (8 cm): Pattern Chart
Every stitch count below is calculated from the gauge and checked round by round, so each round works into exactly the stitches the round before it made. Gauge used: 16 stitches and 18 rows per 10 cm (4 in) in single crochet. A different gauge changes the finished size, so work a small swatch first.
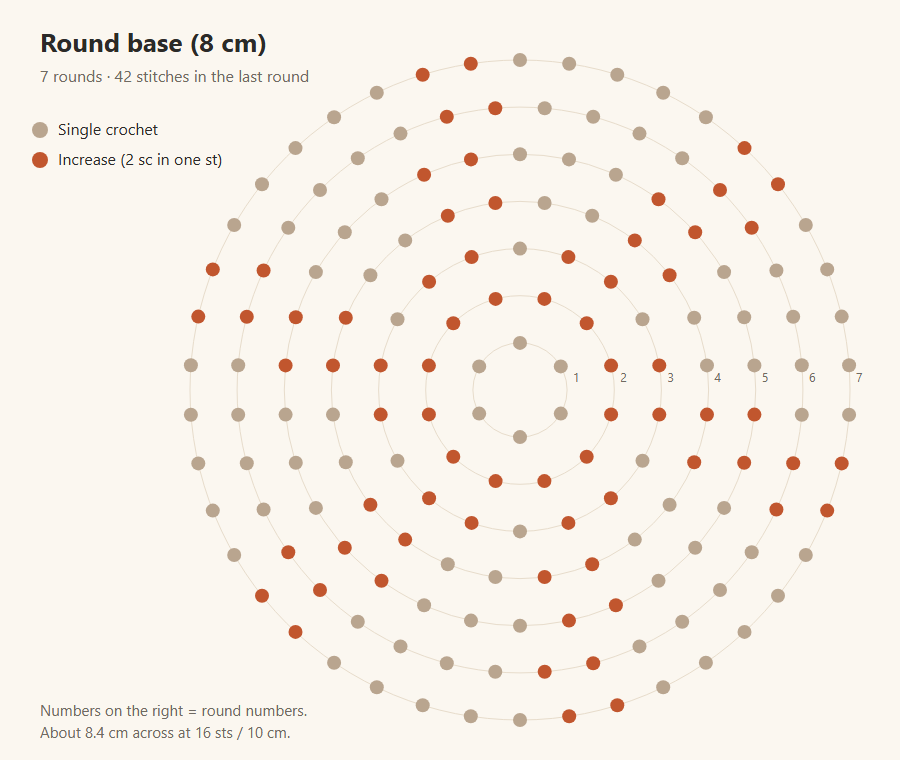
| Round | Instructions | Stitches |
|---|---|---|
| Rnd 1 | 6 sc in a magic ring. | 6 |
| Rnd 2 | inc in each st around. | 12 |
| Rnd 3 | (sc, inc) × 6. | 18 |
| Rnd 4 | (sc in next 2 st, inc) × 6. | 24 |
| Rnd 5 | (sc in next 3 st, inc) × 6. | 30 |
| Rnd 6 | (sc in next 4 st, inc) × 6. | 36 |
| Rnd 7 | (sc in next 5 st, inc) × 6. | 42 |
Yarn needed (estimate): about 10 yards (9 m) for this part. This is a rough estimate, so buy a little extra.
- Work the increases a little to the side of the previous round's increases so the circle stays round, not hexagonal.
Helpful Crochet Tips
- Consistent Tension for Smooth Sides: When working the main body (Stage 2), uneven tension can cause the cylinder to lean or wobble. Practice maintaining a steady, even pull on your yarn to ensure perfectly straight and stable walls for your bottle holder.
- Invisible Seaming for the Pocket: For a clean look when attaching the front pocket (Stage 3), use a whip stitch or mattress stitch with your yarn needle, working through the back loops only of the pouch for minimal visibility.
- Securing Buttons Properly: When attaching the wooden buttons (Stage 5), use a strong thread or a double strand of your yarn and stitch through the buttonholes multiple times, ensuring they are firmly anchored to withstand the weight of the strap and its contents.
- Preventing Strap Stretch: When braiding your strap (Stage 5), aim for a tight, dense braid. A looser braid will stretch more over time, potentially altering the pouch’s hang. Consider braiding with three strands doubled over for extra strength.
And there you have it – your very own “Green Oasis” Pouch, ready to accompany you on all your adventures! This charming accessory isn’t just about utility; it’s a statement piece that reflects your creativity and passion for handmade crafts. The delightful leaf-green cotton provides a natural, earthy feel, while the small burst of pink from the rose adds a sweet, unexpected touch of joy.
Once completed, you’ll find this pouch incredibly versatile. It’s perfect for a brisk morning walk, keeping your water bottle easily accessible and your phone secure. For a variation, you could experiment with different yarn colors – imagine a deep indigo with a white rose, or a sunny yellow with a contrasting blue embellishment. This pouch also makes a thoughtful and personal gift for friends or family who appreciate functional artistry.
Don’t forget to share your finished creation on social media using #GreenOasisPouch – we’d love to see your unique take on this design! Happy crocheting!