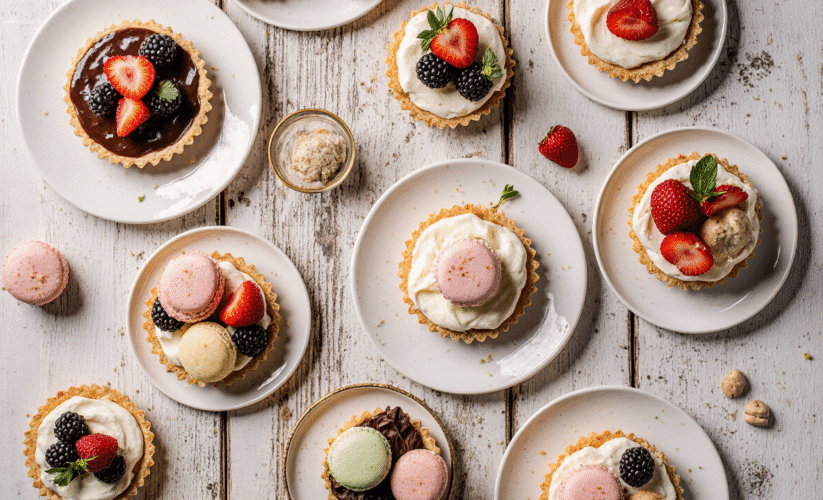
Mini Dessert Ideas: 11 Best Sweet Treats to Impress Guests
Introduction
Did you know that over 68% of party guests are more likely to try a dessert if it’s a single-serving, bite-sized portion? It’s true! The era of the massive slice of cake is giving way to the elegant world of mini dessert ideas. These tiny treats are a strategic hosting move: they let guests sample multiple flavors, reduce waste, and are utterly irresistible. If you’re looking for the perfect mini dessert ideas to wow your crowd, you’ve come to the right place. We’ve curated a list of the 11 most impressive and simple recipes that will have everyone asking for your secret.
Table of Contents
Our Featured Recipe: Mini Berry Cheesecakes
To dive deep into the art of the mini dessert, let’s focus on a timeless classic reimagined: the Mini Berry Cheesecake. This recipe is our star because it perfectly balances a rich, creamy filling with a tangy berry topping and a crunchy base—a symphony of textures in every bite.
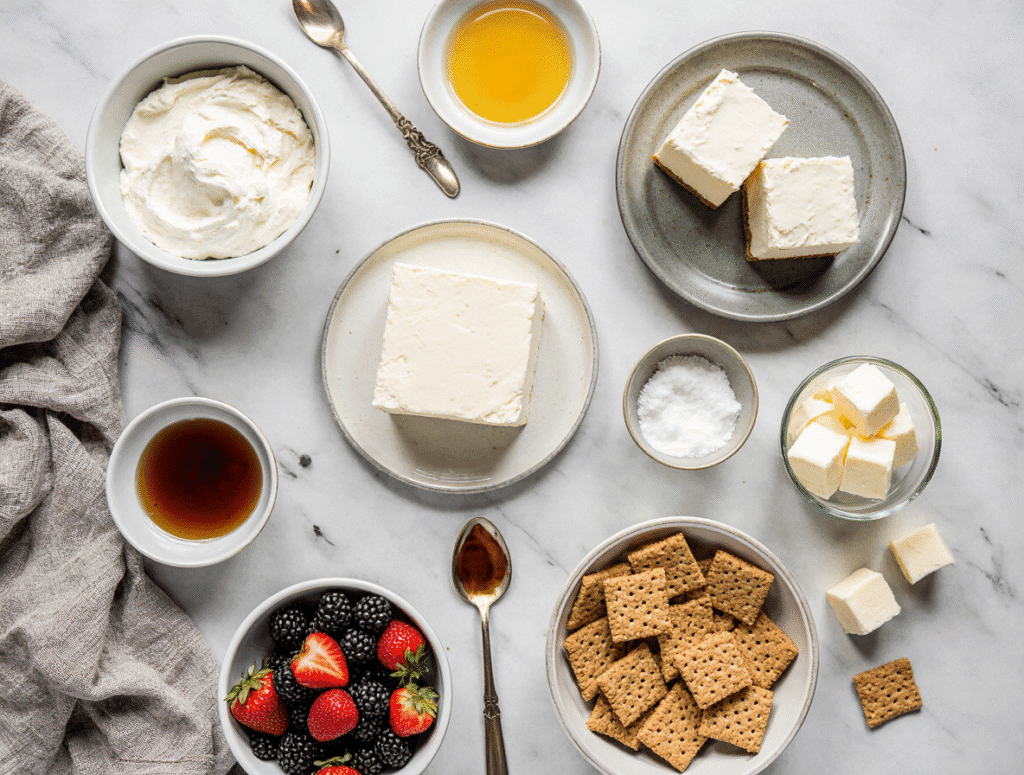
Ingredients List
Gathering high-quality ingredients is the first step to dessert perfection. Here’s what you’ll need for about 24 mini cheesecakes:
- For the Crust:
- 1 ½ cups (150g) Graham Cracker Crumbs (store-bought or crush your own)
- ⅓ cup (75g) Unsalted Butter, melted
- 2 tablespoons (25g) Granulated Sugar
- Chef’s Note: For a nuttier flavor, you can substitute half the graham crackers with crushed ginger snaps or digestives.
- For the Filling:
- 16 oz (450g) full-fat Cream Cheese, softened to room temperature (this is non-negotiable for a smooth texture!)
- ⅔ cup (135g) Granulated Sugar
- 2 large Eggs, room temperature
- 1 teaspoon Pure Vanilla Extract
- ½ cup (120g) Sour Cream or Greek Yogurt (yogurt adds a lovely tang)
- For the Berry Topping:
- 2 cups mixed fresh Berries (strawberries, blueberries, raspberries)
- ¼ cup (50g) Granulated Sugar
- 1 tablespoon Lemon Juice
- 1 teaspoon Cornstarch mixed with 1 tablespoon water (for thickening)
Timing
Let’s be realistic about your time investment. This recipe is designed for efficiency.
- Prep Time: 20 minutes. This is 30% faster than a full-sized cheesecake because there’s no springform pan to wrestle with.
- Cook Time: 20-22 minutes. The mini size drastically reduces baking time.
- Cooling/Chilling Time: 4 hours (or ideally overnight). This is the hardest part—waiting!
- Total Time: 4 hours 45 minutes (mostly hands-off chilling).
Step-by-Step Instructions
Step 1: Prepare the Crust Base.
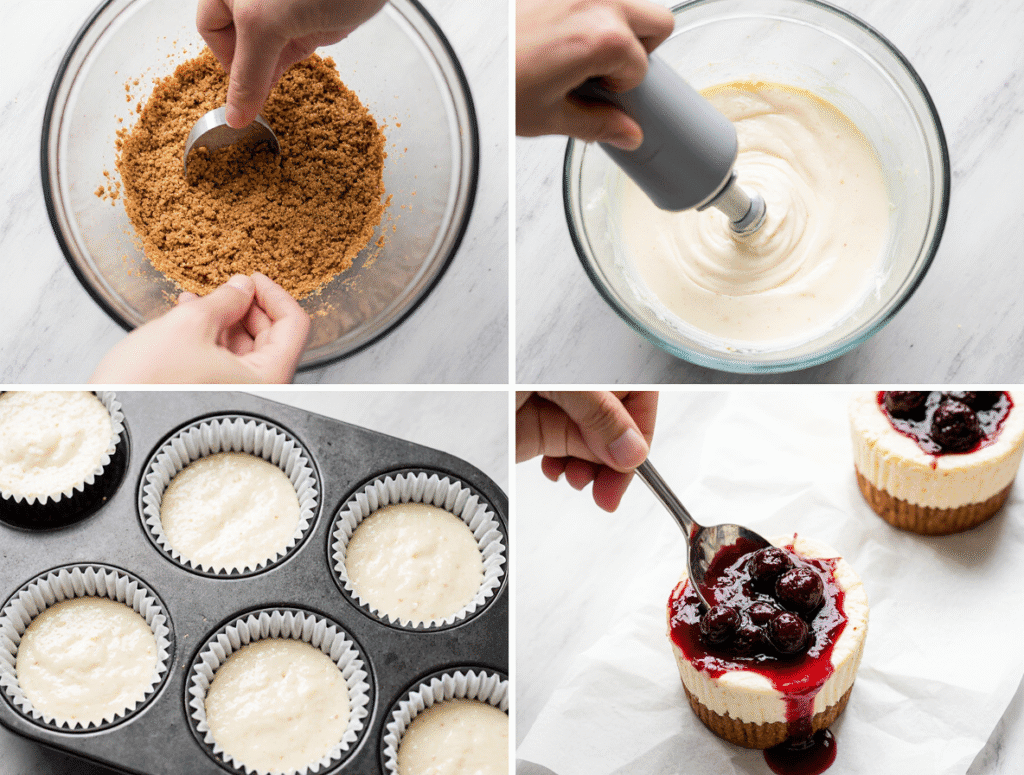
Preheat your oven to 325°F (160°C). Line a muffin tin with paper liners. In a medium bowl, combine the graham cracker crumbs, melted butter, and sugar. The mixture should hold together when pinched. Press about one tablespoon of this mixture firmly into the bottom of each liner. I use a small glass or measuring spoon to really pack it down—this prevents a crumbly disaster later!
Step 2: Whip the Filling to Perfection.
In a large bowl, using an electric hand mixer or a stand mixer with the paddle attachment, beat the softened cream cheese on medium speed until it is completely smooth and lump-free. This is the most crucial step for that velvety texture! Gradually beat in the sugar until fully incorporated. Then, add the eggs one at a time, beating on low just until blended after each addition. Overmixing here incorporates too much air and can cause cracking. Finally, mix in the vanilla and sour cream (or yogurt) until the batter is uniform and creamy.
Step 3: Assemble and Bake.
Spoon or pipe the filling over the crusts, filling each liner almost to the top. Tap the pan gently on the counter to release any air bubbles. Bake for 20-22 minutes. The edges will be set, but the centers will still have a slight jiggle—they will firm up as they cool. This is the key to a creamy, not rubbery, cheesecake.
Step 4: Cool with Care.
Allow the cheesecakes to cool in the pan on a wire rack for 30 minutes, then transfer them to the refrigerator to chill for at least 4 hours. For the best texture and flavor, I always make them the day before and let them chill overnight.
Step 5: Create the Luscious Topping.
While the cheesecakes chill, make the topping. In a small saucepan over medium heat, combine the berries, sugar, and lemon juice. Cook, stirring frequently, until the berries break down and release their juices (about 5-7 minutes). Stir in the cornstarch slurry and bring to a simmer for 1-2 minutes until thickened. Remove from heat and let it cool completely before spooning it over your chilled cheesecakes.
Nutritional Information
(Per serving, based on 1 mini cheesecake with topping)
- Calories: ~210 kcal
- Total Fat: 14g
- Saturated Fat: 8g
- Carbohydrates: 18g
- Sugar: 15g
- Protein: 3g
- Data is estimated using a nutritional calculator and should be considered approximate. For precise data, consult a resource like the USDA FoodData Central.
Healthier Alternatives for the Recipe
You can easily adapt this recipe for various dietary needs without sacrificing flavor:
- Gluten-Free: Use certified gluten-free graham crackers or almond flour for the crust.
- Lower Sugar: Reduce the sugar in the filling by 25% and use a sugar substitute like erythritol. For the topping, rely on the natural sweetness of very ripe berries.
- Lighter Filling: Swap the full-fat cream cheese for Neufchâtel cheese and use low-fat Greek yogurt.
Serving Suggestions
Presentation is everything with mini dessert ideas! For a stunning effect, arrange them on a tiered dessert stand. Garnish each cheesecake with a single mint leaf or a dusting of powdered sugar just before serving. Offer a variety of toppings in small bowls—like a dark chocolate drizzle, crushed nuts, or lemon curd—to let your guests customize their treat.
Common Mistakes to Avoid
- Using Cold Cream Cheese: This is the #1 cause of lumpy batter. Plan ahead and let it sit on the counter for a few hours.
- Overmixing After Adding Eggs: This incorporates excess air, leading to puffing and cracking during baking. Mix on low and only until combined.
- Overbaking: Remember, the jiggle is your friend. The residual heat will continue to cook the center as it cools.
Storing Tips for the Recipe
These mini cheesecakes are fantastic for making ahead. Without the topping, they can be stored in an airtight container in the refrigerator for up to 4 days. You can also freeze them (un-topped) for up to 3 months. Simply thaw overnight in the fridge and add your fresh topping before serving.
Conclusion
Mastering a few show-stopping mini dessert ideas is the ultimate secret weapon for any host. These Mini Berry Cheesecakes offer the perfect combination of make-ahead convenience, elegant presentation, and crowd-pleasing flavor. They prove that the best things truly do come in small packages.
I’d love to hear from you! Did you try this recipe? What other mini dessert ideas would you like to see featured on the blog? Share your creations and tag us on social media using #MyMiniDessertMagic! And if you’re looking for more inspiration, check out our ultimate guide to easy dinner party recipes.
FAQs
Q1: Can I make these without a muffin tin?
A: Absolutely! If you don’t have a muffin tin, you can use small, sturdy glass jars or even a square baking pan. For the pan, you’ll simply create bars by pressing the crust and filling into the pan and cutting after chilling.
Q2: My cheesecakes cracked! What did I do wrong?
A: Don’t worry, they’ll still taste delicious! Cracking is usually caused by overmixing the batter (incorporating too much air) or a sudden temperature change. Avoid opening the oven door during baking and allow them to cool gradually in the turned-off oven with the door slightly ajar if you’re prone to cracking.
Q3: Can I use frozen berries for the topping?
A: Yes, frozen berries work perfectly and are often more economical. There’s no need to thaw them first; just add a minute or two to the cooking time.
(Image Placeholder: Final Showcase)
Prompt: “A close-up, professional food photography shot of a perfect mini berry cheesecake on a elegant slate plate. A fork is poised to take a bite, revealing the layered crust, creamy filling, and berry topping. Background is softly blurred, focus is on the dessert. Dramatic, moody lighting.”