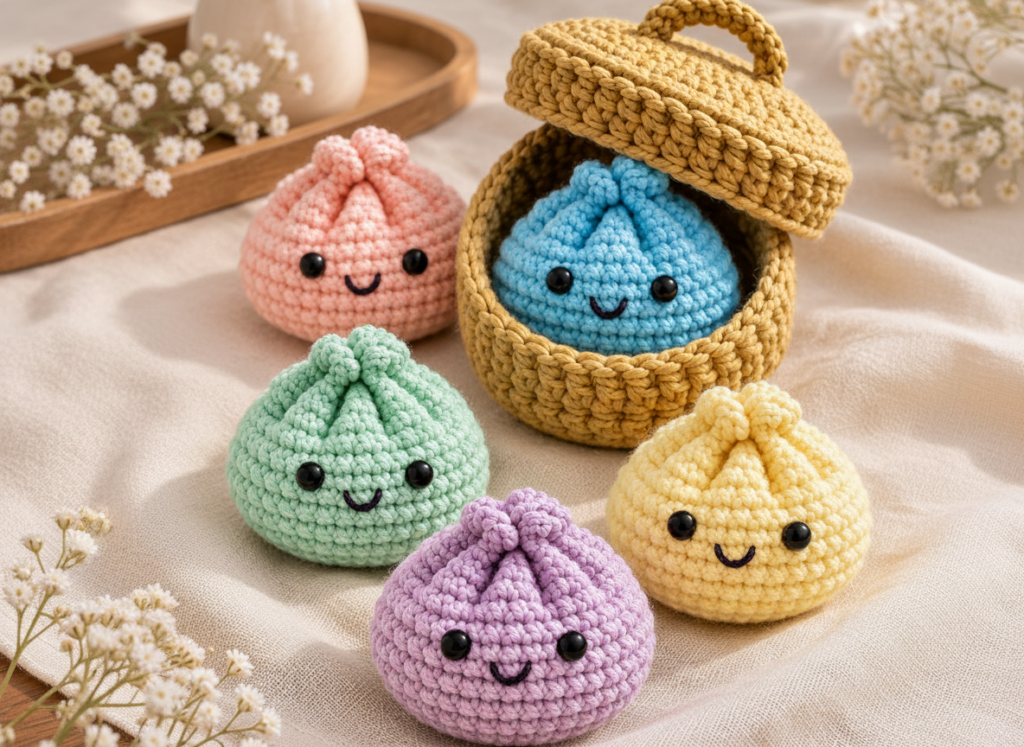
Get ready to create the cutest, most charming little crochet bao buns you’ve ever seen, complete with their very own steamer basket! This delightful pattern will guide you through crafting a family of five pastel bao, each with a sweet, smiling face and distinctive pleated details, nestled in a cozy, textured basket. They’re perfect as adorable desk companions, unique gifts, or simply to bring a touch of handmade whimsy to your home. Using fine cotton yarn, these bao buns have a lovely, soft feel and a satisfyingly plump shape that makes them irresistible.
Whether you’re looking for a fun stash-busting project or a unique item to add to your craft fair lineup, these crochet bao and their basket are sure to be a hit. The combination of simple stitches and clever shaping creates a surprisingly realistic and utterly endearing finished piece that will make everyone smile.
Pattern Info
- Skill Level: Intermediate (requires working in the round, increasing/decreasing, and basic embroidery)
- Finished Size: Bao buns approximately 2.5 inches in diameter; Steamer basket approximately 6 inches in diameter, 3 inches tall.
- Gauge: Not critical for this project, but aim for tight stitches to prevent stuffing from showing.
- Abbreviations Used (US Terms):
- ch: chain
- sc: single crochet
- sl st: slip stitch
- inc: increase (2 sc in one stitch)
- dec: decrease (sc two stitches together)
- BLO: back loop only
- MR: magic ring
Materials
- Fine Cotton Yarn (Weight 2/Sport):
- Lavender: approx. 30 yards
- Mint: approx. 30 yards
- Blush Pink: approx. 30 yards
- Butter Yellow: approx. 30 yards
- Sky Blue: approx. 30 yards
- Honey Gold: approx. 70 yards
- Black: a small amount for embroidery
- Crochet Hook: 2.0mm
- Safety Eyes: 6mm, 10 pairs (2 per bao)
- Fiberfill Stuffing
- Tapestry Needle
- Scissors
- Stitch Markers (optional, but helpful)
Step-by-Step Overview
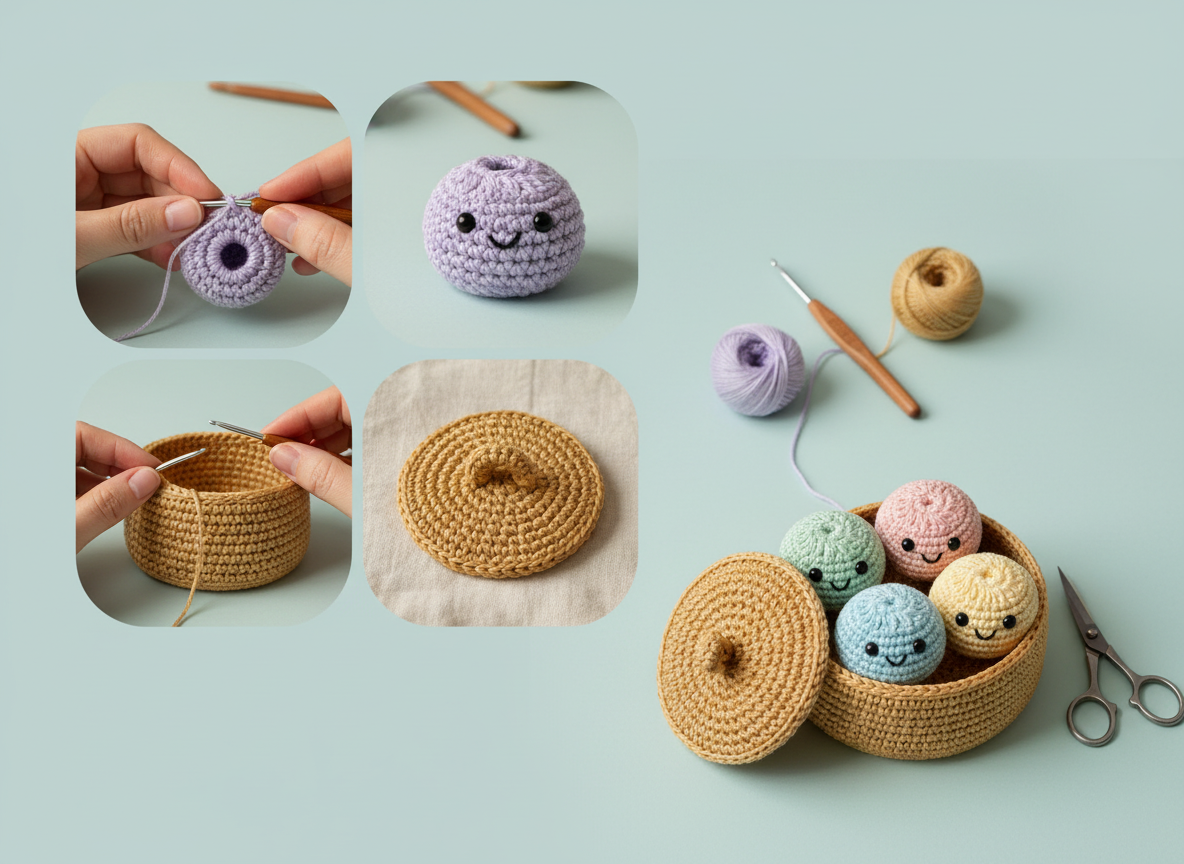
Stage 1 — The Bao Body (Make 5)
Begin by creating a magic ring and working single crochet stitches in continuous rounds. You’ll gradually increase your stitches to form a flat circular base, which will eventually become the bottom of your bao. After achieving the desired width, you’ll work several even rounds to build up the height of the spherical body. Remember to insert the safety eyes between rounds 10-12, spacing them approximately 6-8 stitches apart, before the opening becomes too small. Once the body is nearly complete, firmly stuff your bao with fiberfill, then begin decreasing stitches to shape the top. This careful shaping will result in a slightly flattened bottom and a top ready for gathering. Each bao body ends with 6 stitches remaining before final cinching.
Stage 2 — Bao Facial Features
With the bao firmly stuffed and the safety eyes securely in place, it’s time to bring your little creations to life with their adorable smiles! Using black embroidery floss or a thin strand of black yarn and your tapestry needle, carefully embroider a small ‘U’ shaped smile centrally below the eyes. Aim to span 2-3 stitches for a perfectly proportioned smile. Once embroidered, ensure all yarn ends are neatly secured on the inside of the bao to maintain a clean finish. All 5 bao have eyes secured and mouths embroidered.
Stage 3 — The Steamer Basket Base
The steamer basket begins much like the bao, with a magic ring and single crochet stitches worked in the round, increasing to form a flat circular bottom. Once the base reaches the desired diameter, you’ll transition to creating the basket’s distinctive sides. For this, switch to working in the back loop only (BLO) or using the camel stitch for a prominent horizontal ridge effect, mimicking a real steamer basket. Continue working in even rounds until the basket reaches a height sufficient to comfortably hold one of your bao buns, giving it that authentic, cozy feel. The basket base ends with 30 rounds for the sides.
Stage 4 — The Steamer Basket Lid
To craft the steamer basket lid, you’ll again start with a magic ring and work in continuous rounds, using single crochet in the back loop only (BLO) or camel stitch to perfectly match the texture of the basket base. Increase your stitches until the lid’s diameter precisely matches the top opening of your basket, ensuring a snug fit. Once the main lid is complete, finish off and weave in all ends. For the handle, chain 10 stitches, then slip stitch into the first chain to form a small loop. Securely attach this loop to the very center of the lid using your tapestry needle, creating a sturdy and functional handle. The lid handle is securely attached to the center of the lid.
Helpful Crochet Tips
- Tight Tension is Key: For amigurumi projects like these bao, maintaining a consistently tight tension is crucial. This prevents the fiberfill stuffing from showing through your stitches and helps the finished piece hold its shape better. If your stitches feel too loose, consider going down half a hook size.
- Safety Eye Placement: Before fully closing up your bao, take a moment to test the safety eye placement. Pin them in position first, step back, and ensure they look symmetrical and appealing. Only secure them once you’re satisfied, as they’re difficult to remove once clicked into place.
- Stuffing Technique: Stuff your bao buns firmly and evenly. Use small pieces of fiberfill at a time and push them into all areas, especially around the decreases, to avoid lumps and maintain a smooth, plump shape. The firmness contributes to the bao’s structure.
- Seamless Color Changes: When working with multiple colors for the bao buns, learn a good technique for seamless color changes to avoid obvious bumps or lines. A clean color change makes a big difference in the finished look of your amigurumi.
And there you have it! A delightful family of crochet bao buns, each with its own sweet personality, and a charming steamer basket to complete the set. This project offers such a satisfying blend of traditional crochet techniques and adorable amigurumi shaping. Once completed, these little bao make fantastic decorative pieces for your kitchen, office, or nursery. Imagine them arranged on a shelf, bringing a touch of handmade joy to your space, or gifted as a unique present to a fellow food lover or crochet enthusiast.
You could even customize your bao further by experimenting with different facial expressions or adding tiny blush details with fabric paint. For a more traditional look, you might try using a single color for all five bao, or go wild with a rainbow of hues! The possibilities are endless once you’ve mastered the basic technique.
For a complete visual walkthrough of every step, including all the essential techniques for working in the round, creating those perfect pleats, and securely attaching details, be sure to watch the companion video. It’s an invaluable resource for seeing each stitch come to life and ensuring your bao buns turn out just right. We absolutely love seeing your finished creations, so please don’t forget to share your completed crochet bao and steamer basket with us on social media! Happy crocheting!