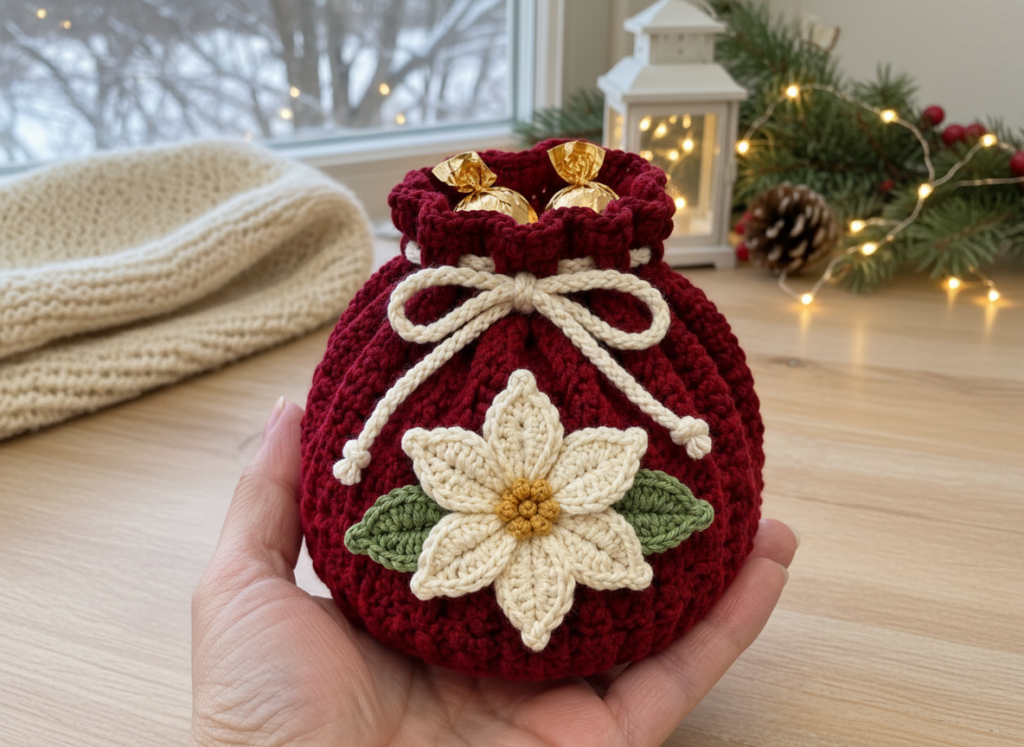
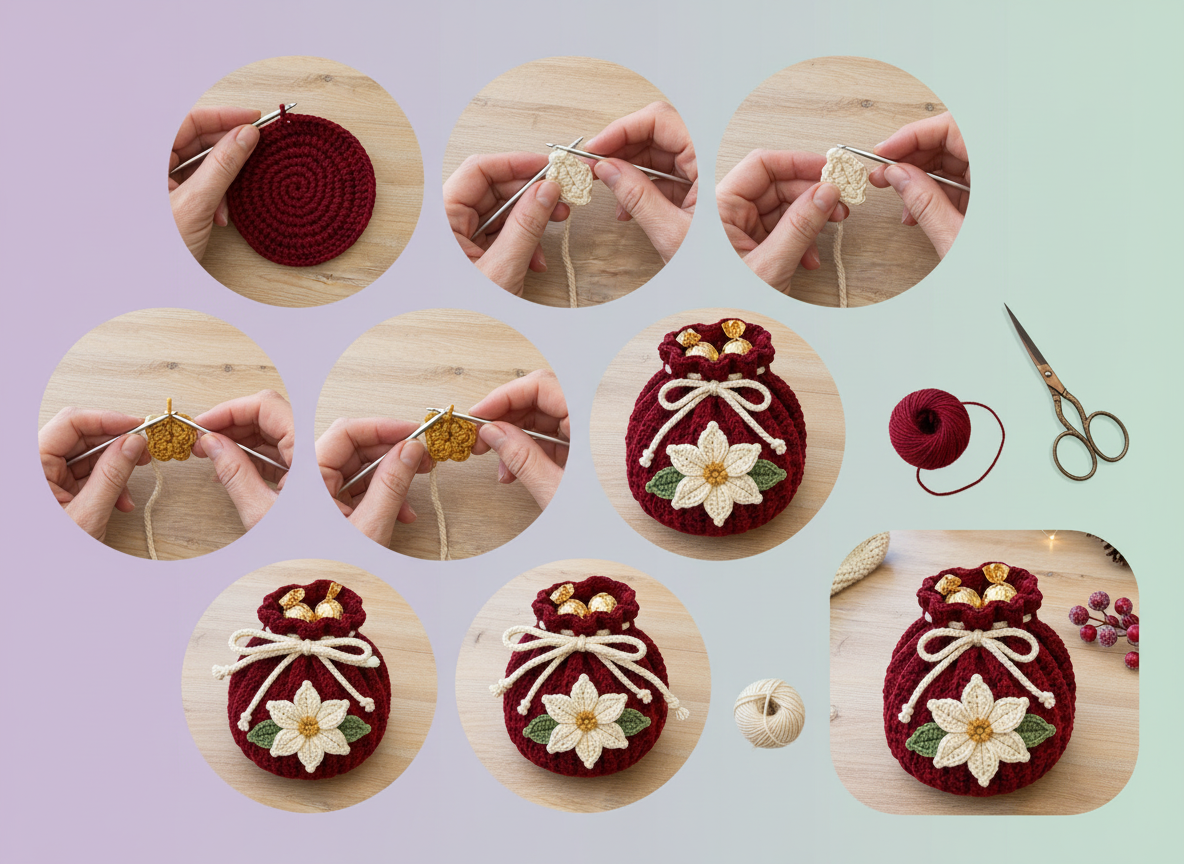
Get ready to create the most charming little accessory for your holiday gifting or festive decor: our Crochet Poinsettia Gift Bag! This delightful deep red pouch, adorned with a sweet cream and mustard poinsettia, is the perfect size for stashing small treasures, party favors, or a couple of delicious chocolates. It’s not just a gift bag; it’s a gift in itself, offering a handmade touch that feels warm, personal, and utterly beautiful.
Pattern Info
- Skill Level: Intermediate (requires working in the round, shaping, and appliqué assembly)
- Finished Size: Approximately 3.5 inches tall, 3 inches diameter at base
- Gauge: 5 single crochet stitches and 5 rounds = 1 inch (for main pouch body)
- Abbreviations Used: ch (chain), sc (single crochet), hdc (half double crochet), dc (double crochet), sl st (slip stitch), inc (increase), dec (decrease), blo (back loop only), MR (magic ring)
Materials
- Worsted Weight (Category 4) Yarn:
- Deep Red: Approximately 50 yards
- Ecru/Ivory: Approximately 20 yards (for petals and drawstring)
- Mustard Yellow: Approximately 5 yards (for flower center)
- Olive Green: Approximately 5 yards (for leaves)
- Crochet Hook: 4.0 mm (G/6)
- Yarn needle
- Scissors
- Stitch marker (optional, but recommended for working in the round)
Step-by-Step Overview
Stage 1 — The Pouch Body
We’ll begin by crocheting the main pouch body, starting with a magic ring and working in continuous rounds. You’ll create a flat circular base using single crochet stitches, increasing evenly to achieve the desired diameter. Once the base is established, you’ll switch to a stitch that creates lovely vertical ribbing for the sides, like half double crochet in the third loop, working without further increases. Finally, you’ll form the drawstring casing by creating a round with chain spaces, followed by a few more rounds to complete the top edge of the pouch. Your base should measure 3 inches in diameter before starting the sides.
Stage 2 — Poinsettia Petals and Leaves
Next, we’ll craft the individual components for our beautiful poinsettia appliqué. For each of the six cream petals, you’ll start with a chain and work back and forth in rows of single and half double crochet, carefully increasing and decreasing to shape them into delicate teardrops. Utilizing techniques like working into the back loop only will give your petals a lovely central ridge. For the two olive green leaves, you’ll start with a chain and then work around both sides of the chain using a combination of single, half double, and double crochet stitches, shaping them into elongated ovals with a neat pointed tip. By the end of this stage, you’ll have 6 cream petals and 2 olive green leaves ready for assembly.
Stage 3 — Poinsettia Center
Now for the vibrant heart of our poinsettia! Using your mustard yellow yarn, you’ll create a small, dense piece for the flower’s stamen. This typically starts with a magic ring or a chain two, worked in the round. The key here is to create a textured, clustered effect using several bobble stitches or popcorn stitches worked into the center. This will give your flower center that characteristic puffy, seed-like appearance. You’ll finish this stage with a compact piece featuring 5 bobble stitches in the center.
Stage 4 — Assembling the Appliqué and Attaching to Pouch
This is where your flower truly comes to life! First, arrange your six cream petals in a circular formation and carefully sew them together at their bases to create the full flower shape. Then, securely sew the mustard yellow center onto the middle of these assembled petals. Next, position the two olive green leaves behind the flower, one on each side, allowing them to peek out slightly, and sew them firmly to the back of the flower. Finally, take your complete poinsettia appliqué, center it on the front of your deep red pouch body, and securely sew it in place. You’ll now have one complete poinsettia appliqué securely sewn to the pouch.
Stage 5 — The Drawstring
The final touch for functionality and charm is the drawstring! You’ll create a long ecru-colored cord, either by braiding several strands of yarn or by making an i-cord, ensuring it’s long enough to cinch the bag fully and tie into a pretty bow. Once your cord is made, tie small knots at each end; these prevent fraying and act as stoppers. Then, using a yarn needle, carefully thread the drawstring cord through the designated chain spaces or holes in the drawstring casing near the top of the pouch. Make sure the cord can be pulled from both sides, allowing you to cinch the opening neatly. Your finished drawstring cord should be 18 inches long.
Helpful Crochet Tips
- For a crisp drawstring casing, make sure your chain spaces are consistent in size and that the stitches in the following rounds are worked firmly to define the opening.
- When sewing the poinsettia petals together, use mattress stitch or whip stitch with matching yarn, working through the back loops of the base stitches for a seamless look.
- To make your bobble or popcorn stitches in the flower center pop, ensure you pull your loop through tightly after completing the stitch, which helps condense the cluster.
- For the leaves, working around both sides of the starting chain can sometimes create a slight gap in the center; use your yarn tail to subtly close any small holes when weaving in ends.
And there you have it – a beautifully handcrafted Crochet Poinsettia Gift Bag, ready to bring a touch of festive elegance to your home or special occasion! This little bag is so versatile; imagine it holding a thoughtful piece of jewelry, a gourmet tea bag selection, or even a small, fragrant sachet. The deep red yarn paired with the classic poinsettia motif makes it perfect for holiday gifting, but you could easily adapt the colors for other seasons – perhaps a pastel pouch with a different flower for spring birthdays.
The joy of this project lies not just in its finished beauty, but in the meditative process of creating each component. From the satisfying rounds of the pouch body to shaping each delicate petal and leaf, you’re building something truly special stitch by stitch. Don’t be afraid to personalize it further; a tiny bead sewn into the flower’s center could add a touch of sparkle!
For a complete visual walkthrough of every step, including how to form those tricky bobble stitches and perfectly assemble your poinsettia, be sure to watch our companion video. It breaks down each stage with clear demonstrations, making it even easier to follow along. Once you’ve completed your own Crochet Poinsettia Gift Bag, we’d absolutely love to see it! Share your creation with us on social media – it’s always inspiring to see how your unique touch brings these patterns to life.