This green fabric wreath starts with half a pool noodle and about 300 small squares of forest-green cotton. In addition, you push each square into the foam with the closed tip of a pair of scissors, and its four corners spring up into a sharp, pointed petal. Packed tightly, the petals hide the foam completely and the green fabric wreath looks like a ring of deep green feathers.
Also, the finished green fabric wreath is about 35 to 40 cm (14 to 16 in) across. We dress it with dried orange slices, little bundles of cinnamon sticks and red berries, so it smells faintly of the kitchen and looks right on a pantry door or beside a dining table. In addition, it only needs patience: most of the time goes into pressing the squares in.
Green fabric wreath at a glance
- Skill level: easy. Also, you cut, press and glue. There is no sewing.
- Finished size: about 35–40 cm (14–16 in) across.
- Time: about 5 to 6 hours in total (an estimate), plus a few hours to dry the orange slices if you make your own.
- Fabric squares: about 250 to 300 squares of 10 × 10 cm (4 × 4 in).
- Main material: forest-green fabric on a pool noodle ring.
What you need for the green fabric wreath
| Item | Amount and notes |
|---|---|
| Pool noodle | One standard noodle, about 150 cm (59 in) long and 6.5 cm (2½ in) thick. You use half of it: 75 cm (30 in). |
| Forest-green fabric | About 3 yd (2.8 m) of 110 cm (44 in) wide cotton or cotton blend. Medium weight and slightly crisp works best. |
| Floral or craft wire | About 10 cm (4 in) to join the ends of the noodle. |
| Clear tape | One roll of strong clear or packing tape. |
| Dried orange slices | 4 slices, about 6 cm (2⅜ in) across. Dry your own (see below) or buy them. |
| Cinnamon sticks | 6 to 9 sticks, about 8 cm (3 in) long, in two or three small bundles. |
| Red-and-white baker’s twine | About 1 m (40 in): a little for the bundles and about 30 cm (12 in) for the hanging loop. |
| Red berry sprigs | 3 to 4 small clusters of artificial berries. |
Tools
- Sharp fabric scissors. The closed tip is also your pressing tool.
- A 10 × 10 cm (4 × 4 in) template cut from cardboard, and a pen or tailor’s chalk. A rotary cutter, ruler and cutting mat make cutting faster, but they are optional.
- In addition, a hot glue gun and 3 to 4 glue sticks.
- Also, a serrated knife to cut the pool noodle in half. In addition, this is a job for an adult.
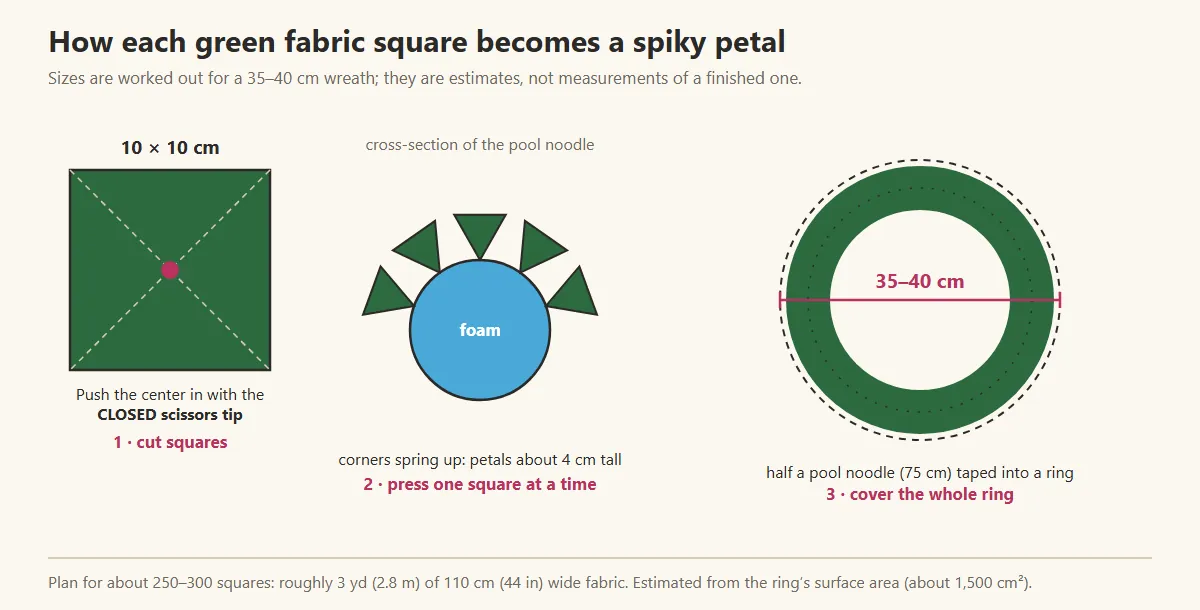
Also, the amounts of fabric and the number of squares are estimates. We worked them out from the surface of the ring, about 1,500 cm², and about 6 cm² of surface for each pressed square, then rounded up. Buy a little extra fabric and cut your squares in batches, so you never run short in the middle of a row.
Dry orange slices for your green fabric wreath
Dried oranges are the one part you can make in your own oven. Slice a firm orange into rounds about 5 mm (¼ in) thick and pat both sides dry with a towel. Lay the slices on a baking tray lined with parchment paper and bake them at about 95 °C (200 °F) for roughly 2½ to 3 hours, turning them once. They are ready when the centers feel dry and the edges curl slightly. Let them cool completely, because they stiffen as they cool.
In addition, these times are estimates, since oven temperatures and orange juiciness vary. If a slice still feels sticky, give it another 20 minutes. Dried slices keep their color best away from direct sun, so store them in a dry box until you are ready to glue.
Choose the fabric and work safely
Pick a deep green fabric of medium weight with a little crispness. It holds its pointed shape once it is pressed in. Very thin fabric looks floppy, and very thick fabric is hard to push into the foam. Wash and iron the fabric first so the squares lie flat. If you use a printed fabric, check that the green stays the main color after cutting.
Then, keep your fingers away from the tip of the glue gun and from melted glue, and work in a well-ventilated room. Next, cut the pool noodle on a stable surface. Finally, remember that fabric, foam and dried fruit all burn easily, so this green fabric wreath should never hang over a stove, an oven or a candle.
How a green fabric square becomes a petal
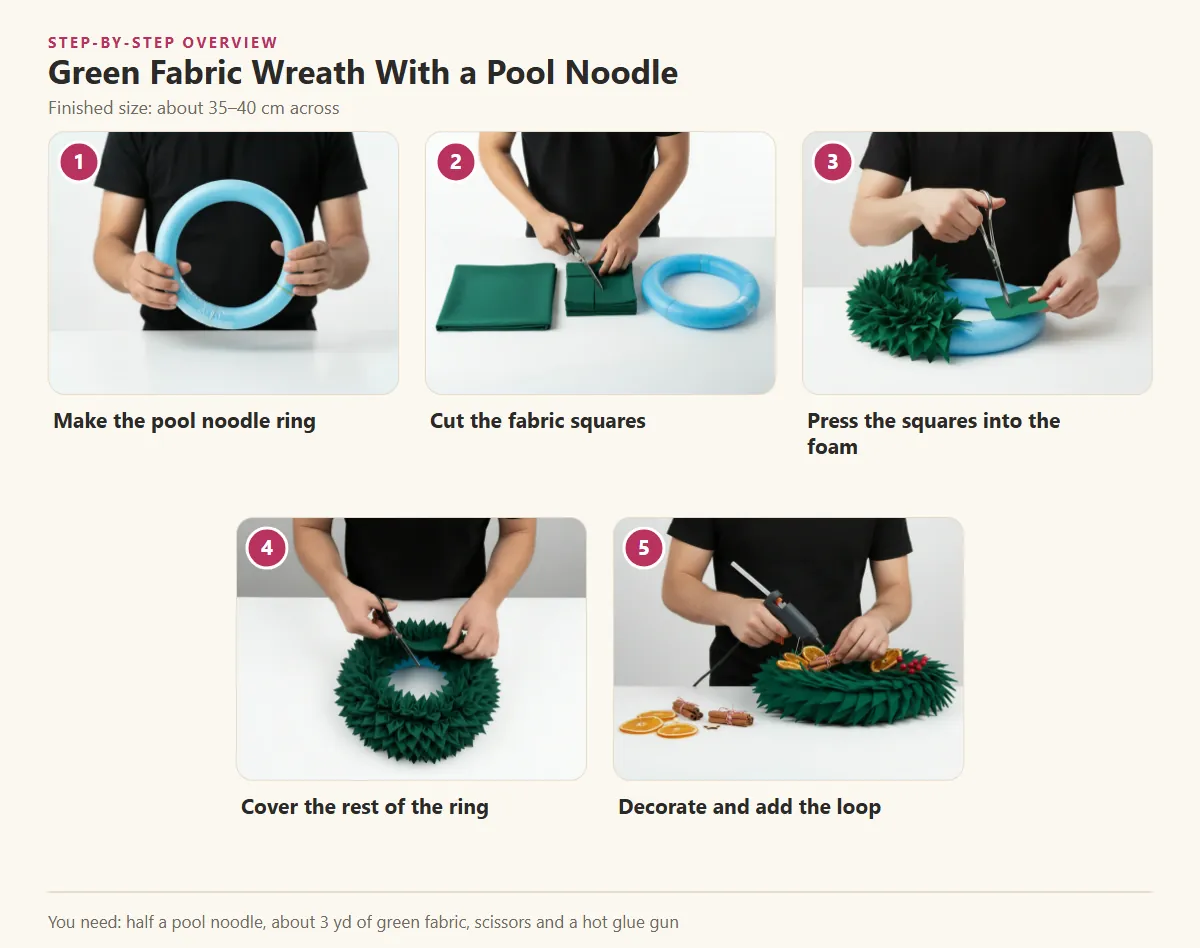
Make the green fabric wreath step by step
Step 1: Make the pool noodle ring
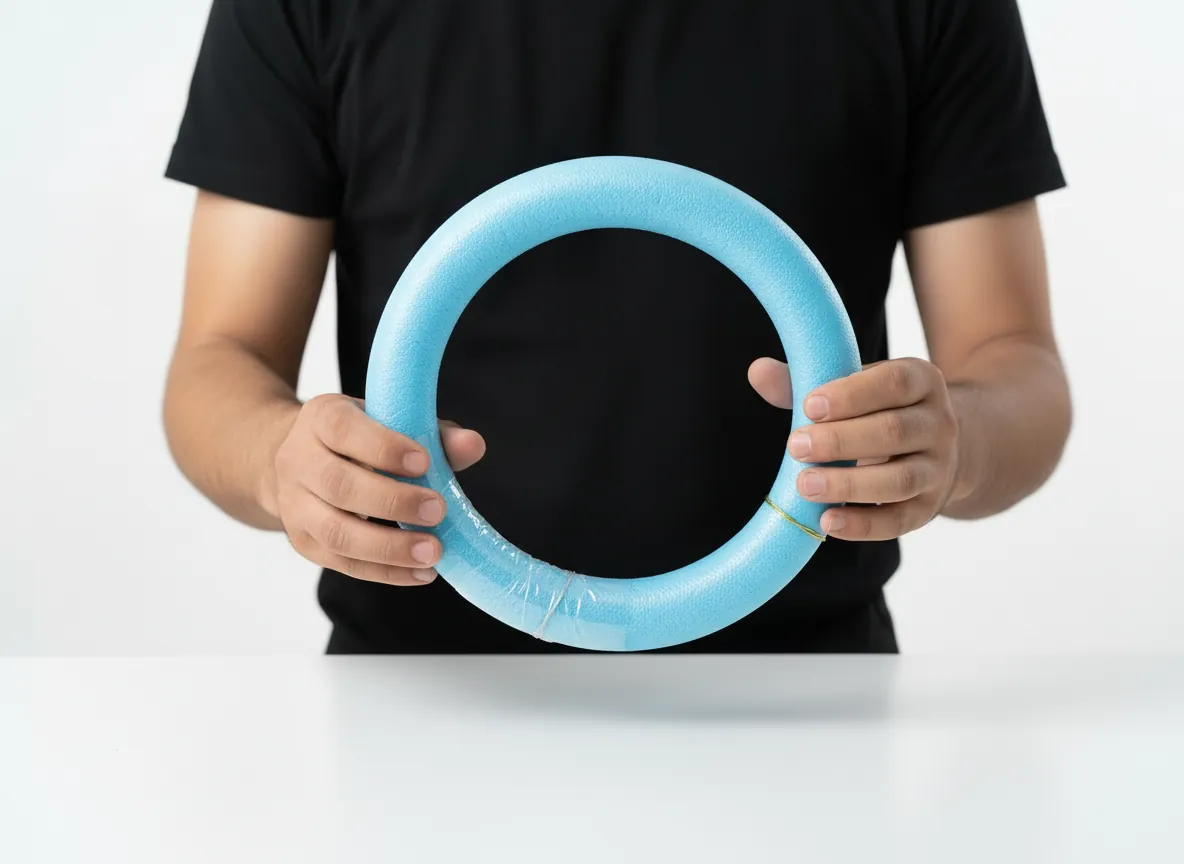
After that, cut the pool noodle in half to get a piece about 75 cm (30 in) long. This length gives a ring about 30 cm (12 in) across, and the petals add about 4 cm on each side, so the finished wreath measures 35 to 40 cm. Also, bend the piece into a circle and push about 5 cm (2 in) of wire through both ends to hold them together. Then wrap strong tape around the joint several times until it is firm.
Checkpoint: When this step is done, the ring is round, the joint does not move when you squeeze it, and the ring lies flat on the table.
Step 2: Cut the fabric squares
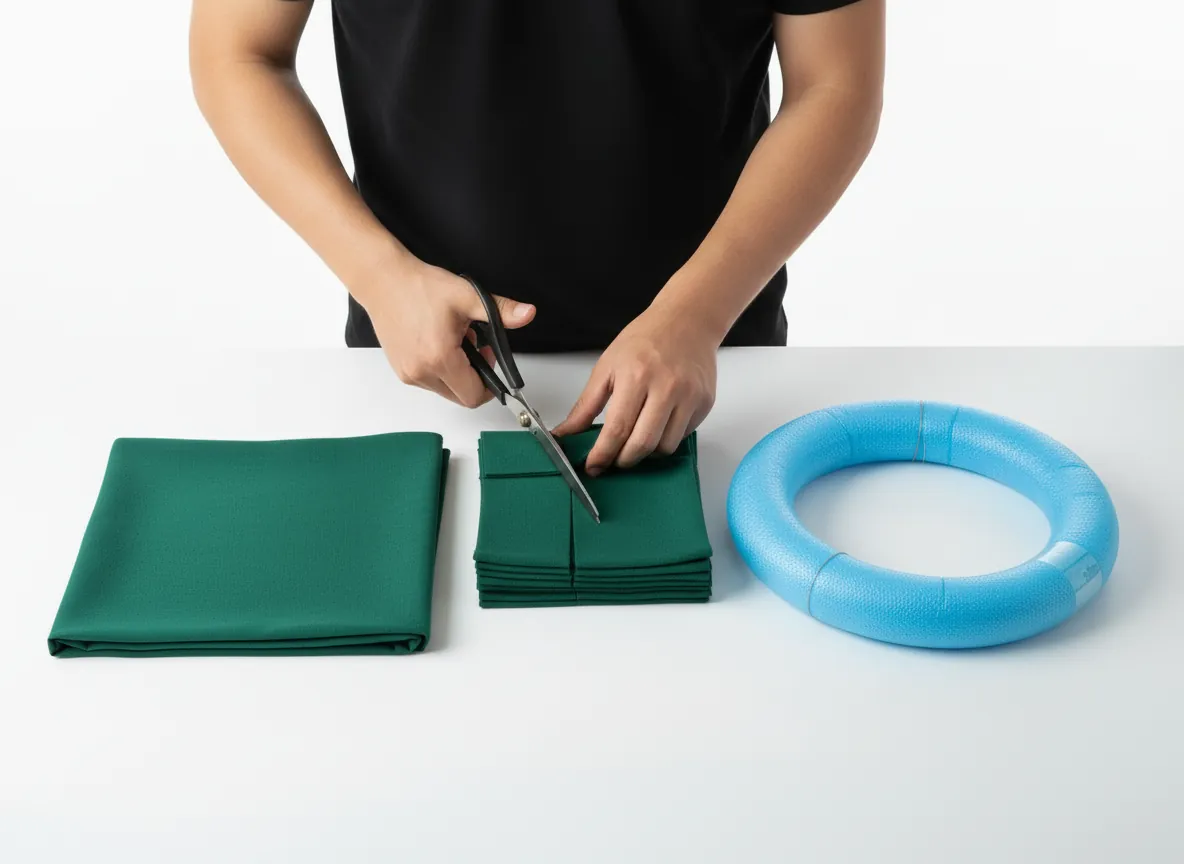
Then, lay the ironed fabric flat and trace the 10 × 10 cm template onto it. Cut along the lines with sharp scissors, or stack four to six layers and cut through them together. You need about 300 squares, so keep them in a pile within reach of your work table. Squares of one size give an even finish, and sharp scissors keep the edges from fraying.
Checkpoint: Before you move on, you have a tidy pile of about 300 identical squares, with a few extra for mistakes.
Step 3: Press the squares into the foam
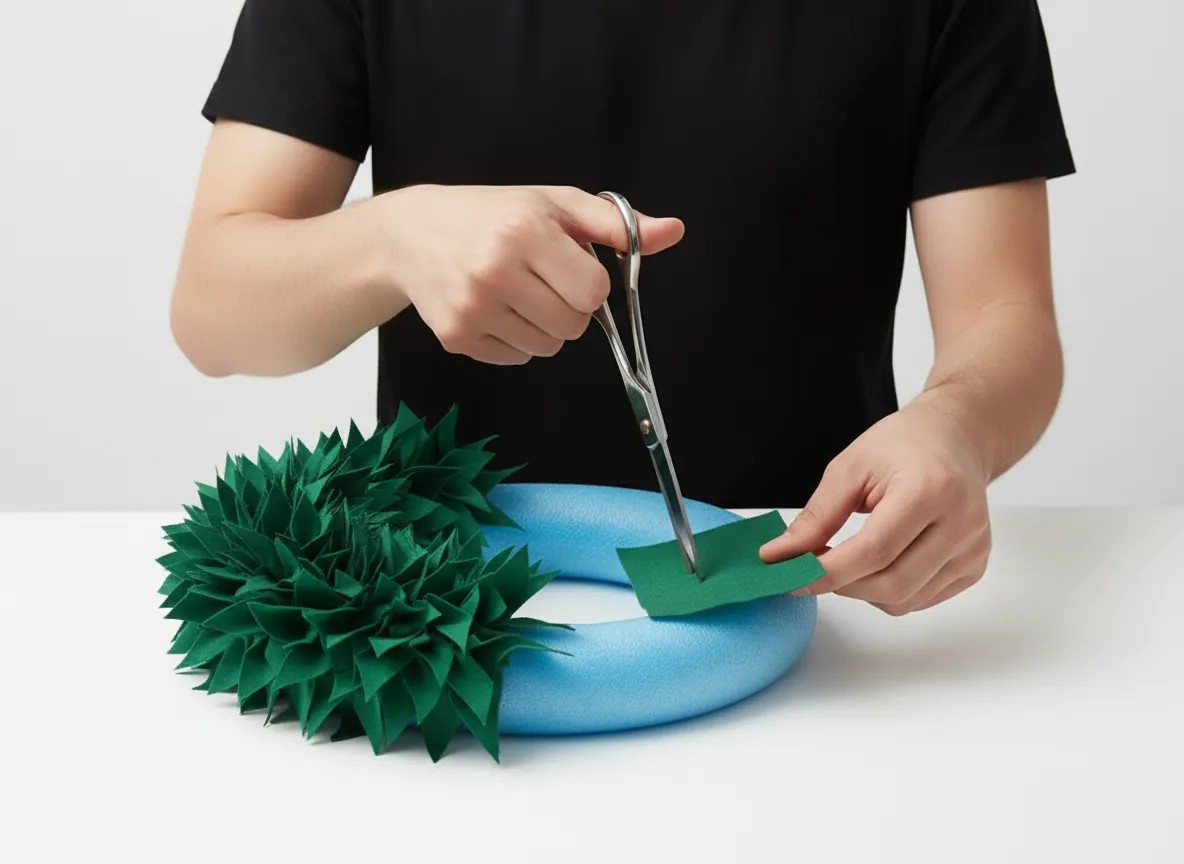
Next, place one square flat against the foam. Hold the scissors closed, with the blades pointing down, and push the closed tip into the center of the square until the center sinks about 1 cm (½ in) into the foam. Also, the four corners spring up into a sharp, pointed petal. Never open the scissors while you press.
After that, start with a row around the inner edge of the ring. Place each new square about 2 cm (¾ in) from the last one, so the petals overlap like feathers. Keep every square turned the same way, so all the points sweep in one direction. Then work a row around the outer edge, and finally fill the top.
Checkpoint: Once you finish this step, half of the ring is covered with overlapping green petals, all pointing the same way, and no square sits loose.
Step 4: Cover the rest of the ring
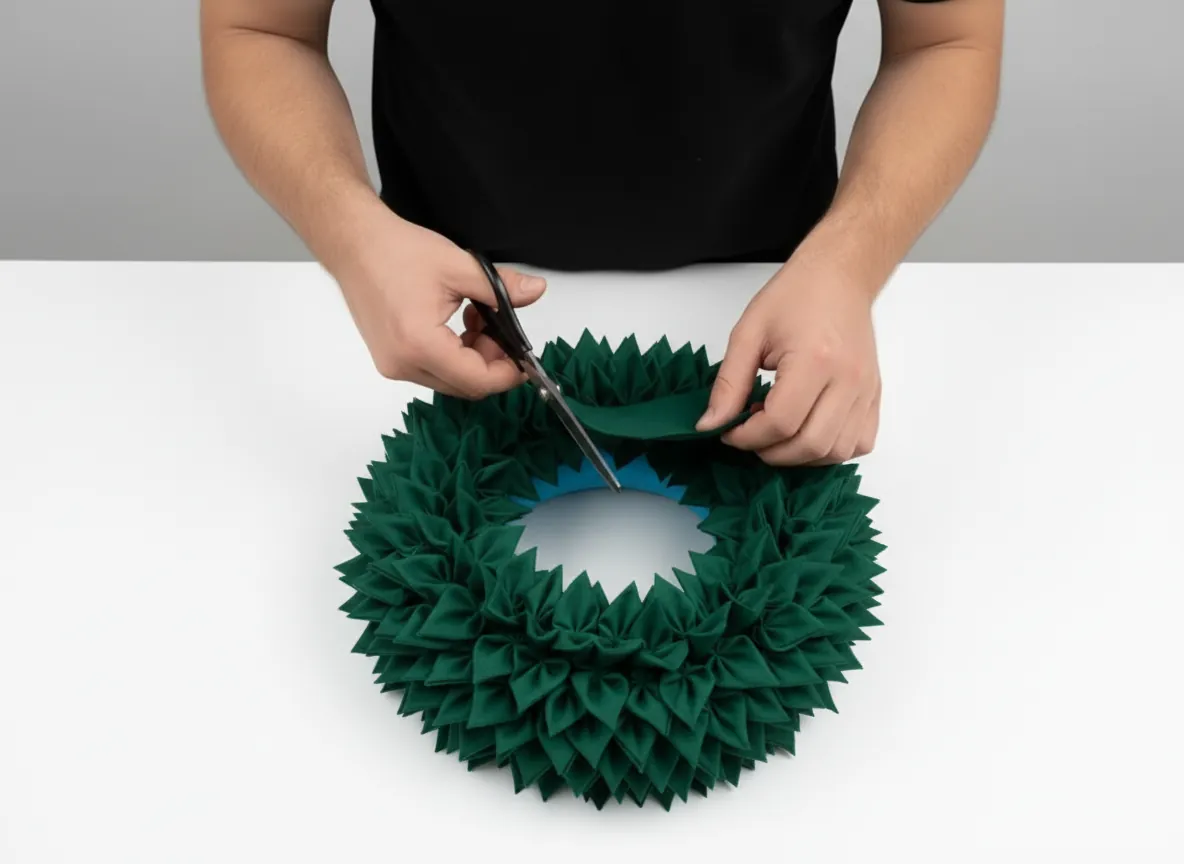
Also, keep going around the ring in the same order. When the main surface is covered, fill the gaps by pushing extra squares into any spot where blue foam still shows. Check the inside edge and the sides, and look at the green fabric wreath from the side, because foam hides easily under the petals. Then turn the green fabric wreath over and check the back too.
Checkpoint: When this step is done, no foam shows from the front, the sides or the inner edge, and the petals form one dense, even layer.
Step 5: Decorate and add the hanging loop
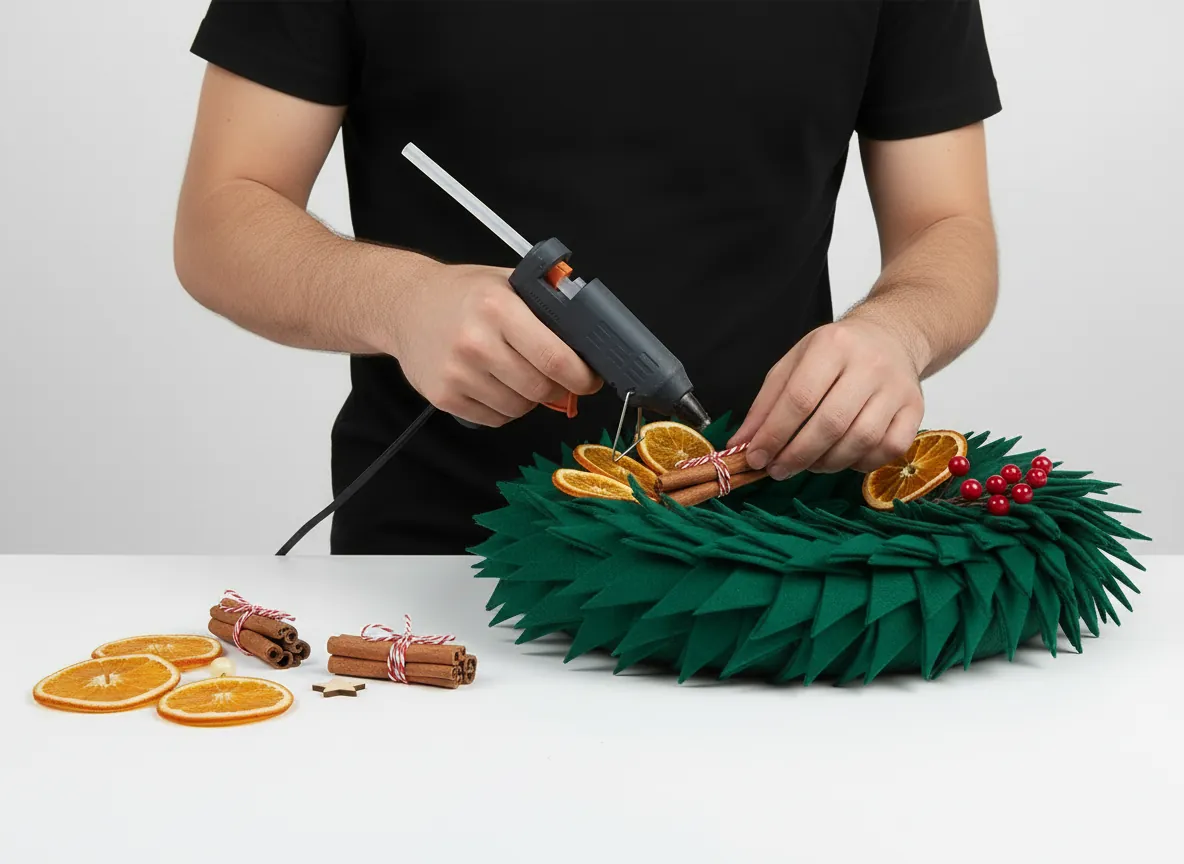
Arrange the decorations before you glue anything. Space the four orange slices evenly around the ring, about 15 cm (6 in) apart, and place a cinnamon bundle between two of the pairs. Then, tuck the berry clusters in the remaining gaps. Tie each bundle of three or four sticks with a short piece of twine, then glue every piece with a drop of hot glue and hold it for a few seconds until it sets.
Finally, fold the 30 cm of twine into a loop and glue the ends to the back of the wreath at the top, with a second drop of glue over them for strength. Let everything set for about an hour before you hang the green fabric wreath.
Checkpoint: Before you move on, every decoration is firm when you touch it, and the loop holds the wreath without leaning.
Fix common problems with a green fabric wreath
- The ring looks lopsided. The noodle was bent unevenly or the joint is loose. Tighten the wire and wrap the tape again before you start covering it.
- The fabric frays a lot. Your scissors may be dull, or the weave is loose. Next, use sharp scissors and a tighter weave.
- The corners do not spring up. Press harder so the center sits about 1 cm deep, or switch to a crisper fabric. Very soft fabric does not hold a sharp point.
- Blue foam shows through. Add squares in the gaps and squeeze them in between the others.
- The orange slices curl or stick. They were not dry enough. Bake them a little longer and let them cool completely before gluing.
- Decorations fall off. Use more hot glue and hold each piece until it sets. After that, glue onto clean fabric.
Ideas to change your green fabric wreath
- Colors: deep burgundy suits autumn and navy looks cool and modern. Two shades of green, alternated by row, make a soft gradient.
- Decorations: swap the oranges for dried lemon slices, add star anise and bay leaves, or tie a small whisk or wooden spoon into the loop for a kitchen theme.
- Size: a full 150 cm noodle makes a larger green fabric wreath, but you will need roughly twice the number of squares.
Display and care for your green fabric wreath
- Where to hang it: hang your green fabric wreath on a pantry or entry door, over a sideboard or on a wall. Light from the side makes the points stand out.
- Keep it away from the stove: heat, steam and cooking grease will mark the fabric and soften the glue. In addition, a dry wall at the far end of the room is safer.
- Keep it dry: avoid damp places and long hours of strong sun, which can fade the green.
- Cleaning: dust it with a soft brush or a can of compressed air. Also, do not use liquid cleaners.
- Storage: wrap it loosely in tissue paper in a sturdy box in a cool, dry place, so the points are not crushed.
Questions about this green fabric wreath
Can I use a different foam base for a green fabric wreath?
Yes. A ready-made foam wreath form works if the foam is soft enough to take the pressed squares without tearing.
How do I get all the squares the same size?
Cut a 10 × 10 cm template from cardboard, trace it onto the fabric and cut along the lines. You can also use it as a guide for cutting a stack of layers.
Can I use another tool to press the squares in?
The closed scissors tip works well because it is sturdy and always the same. Whatever you use must have a blunt tip, so it does not tear the fabric or the foam.
Can I use store-bought dried oranges on a green fabric wreath?
Yes. Also, choose thin, fully dry slices about 6 cm across. They are lighter than home-dried ones and often keep their color for longer.
How many squares will I need for a green fabric wreath?
About 250 to 300 squares of 10 × 10 cm, which is roughly 3 yd (2.8 m) of 110 cm wide fabric. This is an estimate, so cut a few extra.
How this guide was made
The sizes and quantities in this green fabric wreath guide are estimates worked out from the size of the ring and the squares, so treat them as a starting point and cut a few extra squares. In addition, the step images, diagram and video are illustrative renderings, not photographs of one specific finished wreath.
More projects to try
- Textured crochet pinecone ornament for the holidays
- Frosted Christmas Santa gift bag crochet pattern
- Learn more about cinnamon, the spice behind the sticks on this wreath.