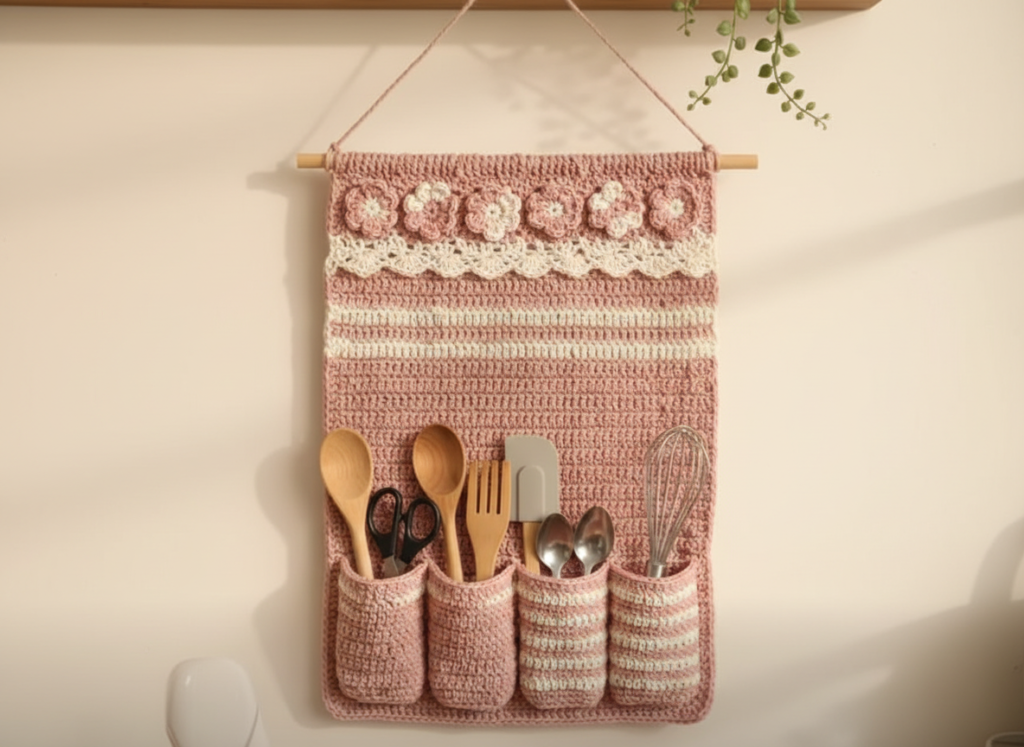
Tired of cluttered kitchen counters? Create a beautiful and functional solution with our Pink and White Crochet Kitchen Organizer! This charming wall-hanging organizer features five spacious pockets, perfect for stowing away your essential kitchen tools, from wooden spoons to whisks. Made with soft cotton yarn in dusty-rose pink and warm ivory-white, this piece adds a touch of handmade elegance and practical storage to any kitchen. Its sturdy construction and delightful decorative elements make it a joy to both create and use.
Once finished, you’ll have a delightful organizer that not only keeps your utensils tidy but also brightens your space with its gentle colors and intricate details. The combination of solid and striped pockets, along with the sweet floral embellishments, gives it a unique, cozy farmhouse appeal. It’s truly a labor of love that results in a functional piece of art for your home.
Pattern Info
- Skill Level: Intermediate
- Finished Size: Approximately 48 cm wide x 55 cm tall
- Gauge: 18 sc and 20 rows = 4 inches (10 cm) with 4.0 mm hook (adjust as needed for desired fabric density)
- Abbreviations Used: ch (chain), sc (single crochet), hdc (half double crochet), sl st (slip stitch), dc (double crochet), st (stitch), yo (yarn over), Rnd (Round)
Materials
- Cotton Yarn, Worsted Weight (Category 4):
- Dusty Rose Pink: Approximately 400 yards (e.g., Lily Sugar’n Cream in Rose Pink)
- Warm Ivory-White: Approximately 150 yards (e.g., Lily Sugar’n Cream in Ecru or Off White)
- Crochet Hook: 4.0 mm (G/6)
- Yarn Needle (for weaving in ends and assembly)
- Scissors
- Stitch Markers (optional, but helpful for rounds)
- Slim Natural Wooden Dowel: Approximately 50 cm long, 1 cm diameter
- Natural Jute Cord: Approximately 1 meter long (for hanging)
Step-by-Step Overview
Stage 1 — The Main Back Panel
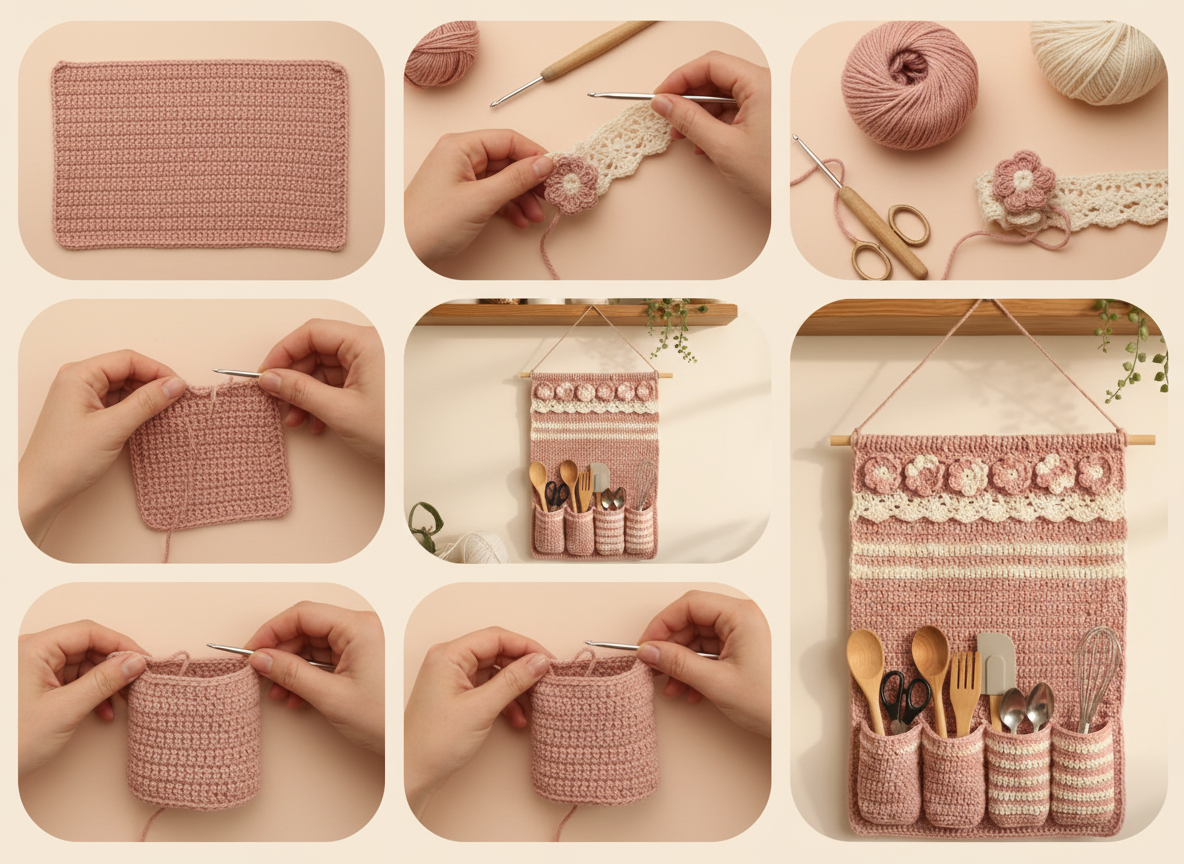
Begin by creating the foundational rectangular back panel of your organizer. This piece is worked flat in rows, primarily using single crochet stitches in dusty-rose pink cotton yarn to ensure a sturdy and dense base. As you progress, you’ll introduce two narrow horizontal stripes of warm ivory-white yarn by changing colors for 1-2 rows each, strategically placed about one-third down from the top edge for visual interest. The top edge of the panel is designed to be slightly thicker, possibly using half double crochet or single crochet through the back loop, forming a secure channel through which the wooden dowel will later pass. To give the entire panel a polished and neat finish, complete it with a single round of single crochet in dusty-rose pink around all edges. This will leave you with a finished panel measuring approximately 48 cm wide and 55 cm long.
Stage 2 — Lace Trim and Flower Motifs
Next, you’ll craft the delicate decorative elements that adorn the upper portion of your organizer. Start by crocheting the lace trim using warm ivory-white yarn. This will be a flat strip of openwork, typically employing a pattern of chain spaces and double crochets to create a beautiful, subtly scalloped bottom edge. Following the lace trim, you’ll move on to creating five identical three-dimensional flower appliqués. Each flower begins with a small dusty-rose pink center, worked in the round to form a solid core. Then, five off-white petals are added around this center, often using puff stitches or similar techniques to achieve a lovely raised, textured effect. By the end of this stage, you will have produced 1 lace trim strip and 5 identical flower motifs, ready for assembly.
Stage 3 — The Storage Pockets
Now it’s time to create the functional storage components: the five pockets. You will crochet these in the round to form cylindrical shapes. Two of these pockets will be solid dusty-rose pink, providing a classic look, while the remaining three will feature eye-catching alternating stripes of dusty-rose pink and warm ivory-white. Each pocket starts with a flat base, typically initiated with a magic ring or by chaining two and working single crochet rounds into it. The sides are then worked in continuous single crochet rounds, ensuring no increases, to maintain the cylindrical form. For the striped pockets, you will alternate colors every 2-3 rows to create crisp, even bands. Finish the top edge of each pocket with a neat slip stitch or single crochet round to provide a clean and durable opening. Upon completing this stage, you will have created 2 solid pink pockets and 3 striped pockets, each approximately 10-12 cm tall and 8-10 cm in diameter.
Stage 4 — Assembly and Finishing
With all your crocheted components ready, it’s time to bring your organizer to life through assembly. Begin by carefully sewing the warm ivory-white lace trim horizontally onto the main back panel, positioning it just below the top dowel channel. Next, arrange and securely sew the five flower appliqués evenly spaced across the panel, directly above the lace trim, creating a charming decorative band. Then, take your five pockets and securely sew them to the bottom portion of the main back panel, arranging them side-by-side with their bottoms aligned with the panel’s bottom edge. For a balanced look, place the two solid pink pockets on the outer ends, flanking the three striped pockets in the middle. Finally, thread the wooden dowel through the pre-made channel at the very top of the main back panel and securely attach the natural jute cord to both ends of the dowel, creating a robust hanging mechanism. At this checkpoint, all crocheted components are securely joined to the main back panel, and the hanging dowel with cord is in place, ready to display.
Helpful Crochet Tips
- Tension Consistency for Stripes: When changing colors for stripes on the back panel and pockets, make sure your tension remains consistent. Tug gently on the previous color’s yarn tail after the first stitch of the new color to keep the edge neat and prevent gaps.
- Invisible Seams for Pockets: To make your pocket seams less noticeable, use the mattress stitch or whip stitch with a yarn needle in a matching color. Sew through the back loops of the stitches on both pieces for a flatter, more integrated join.
- Securing Flower Appliqués: When attaching the small flower motifs, use a yarn needle and small, discreet stitches in a matching thread to secure them firmly. Stitch through the back of the flower and into the main panel at several points to prevent them from drooping or coming loose over time.
- Doweling for Even Hanging: Ensure the dowel channel is wide enough for your chosen dowel, but not so loose that the organizer sags. When inserting the dowel, gently work it through to avoid distorting the fabric. This will help your organizer hang flat and evenly.
And there you have it—your very own handcrafted Pink and White Crochet Kitchen Organizer! This project is more than just a pattern; it’s an opportunity to create something truly special and functional for your home. Imagine the satisfaction of reaching for a whisk or a wooden spoon, knowing it’s neatly tucked away in a beautiful, handmade pocket that you brought to life with your own hands.
This organizer isn’t just for the kitchen, either. Consider using it in a craft room to hold brushes and tools, or even in a nursery for small essentials. The soft colors and charming design make it versatile enough to complement various decor styles. It also makes a thoughtful and personal handmade gift for a housewarming, a bridal shower, or simply to show someone you care. You can even try adding a small embroidered initial to one of the pockets for an extra personalized touch!
We know that sometimes seeing a technique in action makes all the difference. For a full visual walkthrough of each stage, from crocheting the main panel to attaching the decorative flowers and pockets, be sure to watch our companion video tutorial. It provides close-ups and real-time demonstrations to guide you through every step, ensuring your project turns out beautifully. Once your Pink and White Crochet Kitchen Organizer is complete, we’d love to see it! Share your finished piece with us on social media and inspire fellow crafters. Happy crocheting!