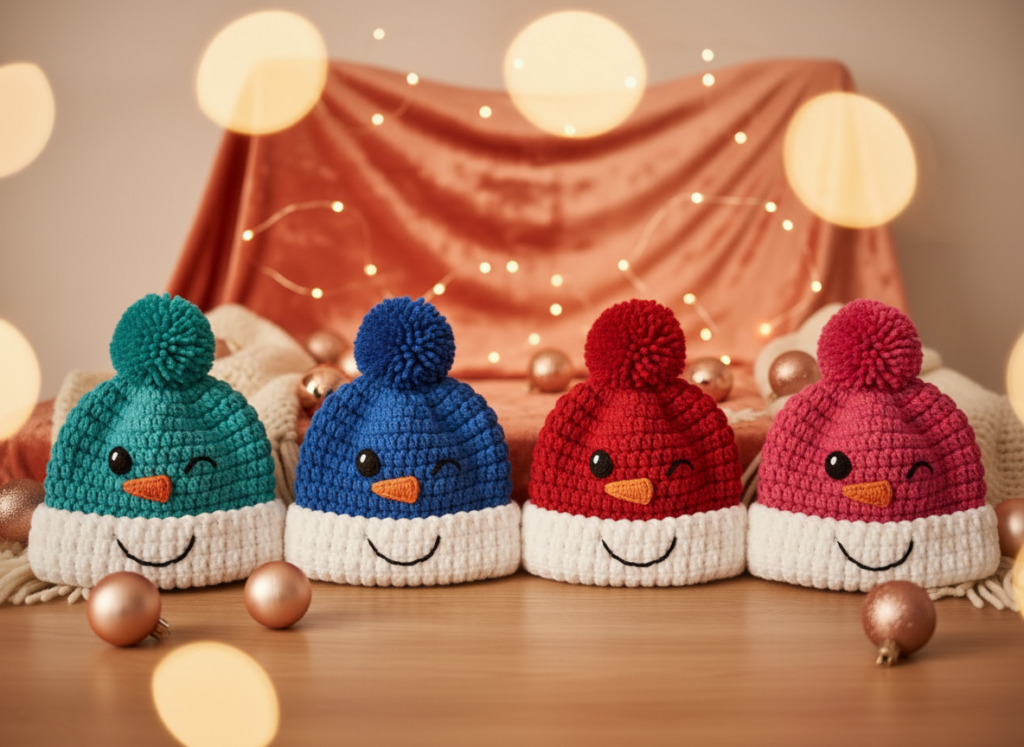
Get ready to create the most adorable accessory for the winter season: a charming winking snowman beanie! This pattern guides you through making a cozy, square-grid textured hat, complete with a cheeky winking face and a fluffy pom-pom. It’s a delightful project that’s not only fun to crochet but also results in a wonderfully unique and heartwarming gift or a cheerful addition to your own winter wardrobe, guaranteed to bring smiles wherever it goes.
The finished beanie is soft, warm, and boasts a substantial feel, thanks to the linen stitch, making it perfect for chilly days. The vivid aqua-turquoise paired with a crisp white band offers a fresh, joyful aesthetic that truly makes the snowman’s face pop. You’ll love seeing this little character come to life with each stitch.
Pattern Info
- Skill Level: Advanced Beginner
- Finished Size: Approximately 8 inches wide by 6 inches tall (when flat, excluding pom-pom)
- Gauge: 18 stitches x 18 rows = 4 inches in linen stitch
- Abbreviations Used (US Terms): ch (chain), sc (single crochet), sl st (slip stitch), st(s) (stitch/es)
Materials
- Yarn: Worsted Weight (Category 4) cotton-acrylic blend
- Vivid Aqua-Turquoise: approximately 100-120 yards
- Pure White: approximately 30-40 yards
- Black: small amount for facial features
- Orange: small amount for nose
- Hook: 4.0 mm (G-6) crochet hook
- Notions: Yarn needle, scissors, pom-pom maker (extra-large size)
Step-by-Step Overview
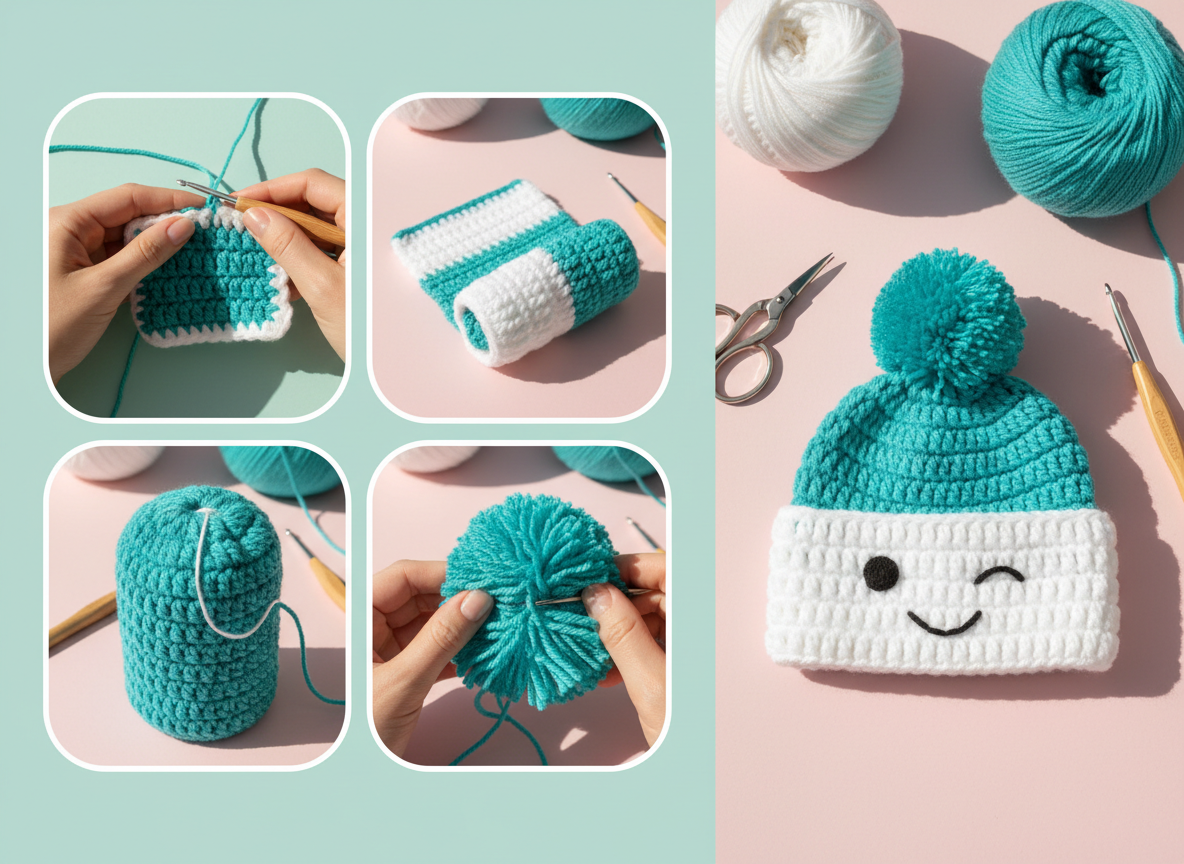
Stage 1 – The Flat Panel
Your snowman beanie begins as a simple flat rectangle, crafted primarily in the linen (or moss) stitch to achieve a dense, square-grid texture. You’ll start with a few rows in pure white for the brim, then create a tiny scalloped edge before seamlessly transitioning to the vibrant aqua-turquoise yarn for the main body of the hat. Consistent tension is key here to ensure your panel maintains its crisp rectangular shape and stitch definition, until you reach approximately 8 inches wide by 6 inches tall.
Stage 2 – Seaming the Body
Once your rectangular panel is complete, the next step transforms it into a three-dimensional shape. Fold the panel in half, bringing the two short edges together perfectly. Using a yarn needle and matching yarn – white for the white section and aqua-turquoise for its corresponding part – you’ll carefully seam these edges together using an invisible seam method. This creates a continuous tube, forming the basic body of your hat with the white band neatly at one end.
Stage 3 – Gathering the Crown
With your hat body now a tube, it’s time to shape the top. Thread a long piece of aqua-turquoise yarn onto your yarn needle. Work a running stitch in and out along the very top edge of the aqua-turquoise section, making sure to gather the stitches evenly around the entire circumference. Gently pull the yarn tight to draw the opening closed, forming the beautifully rounded crown of the hat, and then secure the gathering yarn firmly with a strong knot to finish this stage.
Stage 4 – Attaching the Pom-Pom
No snowman hat is complete without a fluffy pom-pom! Create an extra-large, perfectly round pom-pom using the same vivid aqua-turquoise yarn that matches the hat body – a pom-pom maker will help you achieve a consistent and dense shape. Once your pom-pom is fluffed to perfection, securely attach it to the very center of the gathered crown of your hat, ensuring it stands upright and is firmly anchored for durability.
Stage 5 – Stitching the Snowman Face
The final, most charming detail is bringing your snowman to life. Using black yarn, stitch one neat, round left eye onto the white band of the hat. For the right eye, create a small, curved stitch to capture that playful, happy wink. Next, use orange yarn to stitch a small, round nose in the center, and finally, with black yarn, create a cheerful, curved smile below the nose. Ensure all facial features are evenly spaced, secure, and truly capture the winking personality of your snowman.
Helpful Crochet Tips
- Tension for Linen Stitch: The linen stitch (sc, ch 1, skip 1) works best with consistent tension to achieve that desired square-grid texture. If your stitches are too loose, the fabric might be too open; too tight, and it can be stiff. Practice a swatch to find your perfect tension.
- Invisible Seam: When seaming the short edges, use a whip stitch or mattress stitch through the back loops only for an almost invisible join. This keeps the texture continuous and prevents a bulky seam.
- Secure Pom-Pom Attachment: To ensure your pom-pom stays put, thread the tie ends through the gathered crown several times, pulling tightly. You can even add a dab of fabric glue to the knot inside the hat for extra security, especially if it’s for a child.
- Facial Feature Placement: Before permanently stitching the snowman’s face, use pins or stitch markers to map out the placement of the eyes, nose, and smile. This allows you to adjust the proportions and expression until you’re perfectly happy with your winking friend.
And there you have it – your very own winking snowman beanie, ready to spread cheer and warmth! This hat isn’t just an accessory; it’s a little piece of handmade joy, perfect for brightening up dreary winter days. The combination of the soft yarn, the distinctive linen stitch texture, and that playful winking face makes it incredibly unique.
Imagine gifting this to a loved one – it’s a personal, heartfelt present that shows you’ve poured your time and creativity into something special. While we’ve showcased it in vibrant aqua-turquoise and crisp white, feel free to experiment with other color combinations! A ruby red snowman with a white band, or perhaps a cozy forest green, would be equally charming. The pattern is versatile enough to allow your imagination to run wild, creating a whole family of winking snowmen.
To really see each step come to life, from that initial flat rectangle to the final stitch of the smile, be sure to watch our companion video. It offers a full visual walkthrough, guiding you through the folding, seaming, gathering, pom-pom attachment, and face stitching with close-up shots and helpful tips. Don’t forget to share your finished winking snowman beanies with us – we absolutely love seeing your creations!